In our last post we provided a step-by-step tutorial that explained how to debug Enterprise Java applications on TomEE from the Eclipse IDE. This time we’ll do the same thing but with IntelliJ!
I’ve always found debugging Enterprise Java applications to be a challenge, but modern features of the Java Virtual Machine and tools like IntelliJ make it easy. If you are already familiar with IntelliJ but have not debugged a TomEE application, then this will be a quick but useful tutorial. If you are new to IntelliJ or TomEE you’ll find the steps outlined here very easy to follow.
There are a few things we are going to do in this article to get you up and running with debugging Enterprise Java with TomEE and IntelliJ. I’ve broken these into six short sections each one preparing you for the last section where you do the actual debugging.
- Section 1: Download, install and run TomEE
- Section 2: Download and Install the IntelliJ IDEA Ultimate
- Section 3: Create an IntelliJ Java Enterprise Web Project
- Section 4: Create a Web App for TomEE
- Section 5: Connect IntelliJ to TomEE
- Section 6: Run the Web App in TomEE from IntelliJ
- Section 7: Debug the Web App in TomEE from IntelliJ
Section 1: Download, install, and Run TomEE
Tomitribe provides support for open source and, in particular, Apache TomEE a Java EE Application Server, so we’ll use that as our Java EE application server.
1. Download the TomEE PluME application server
If you do not already have TomEE installed have no fear, it’s pretty easy to set it up.
- Open your browser and go to tomee.apache.org’s download page.
- Select the latest version of TomEE Plume (8.0.0 M1 as of this writing) and the type of archive file you prefer (TAR.GZ or ZIP).
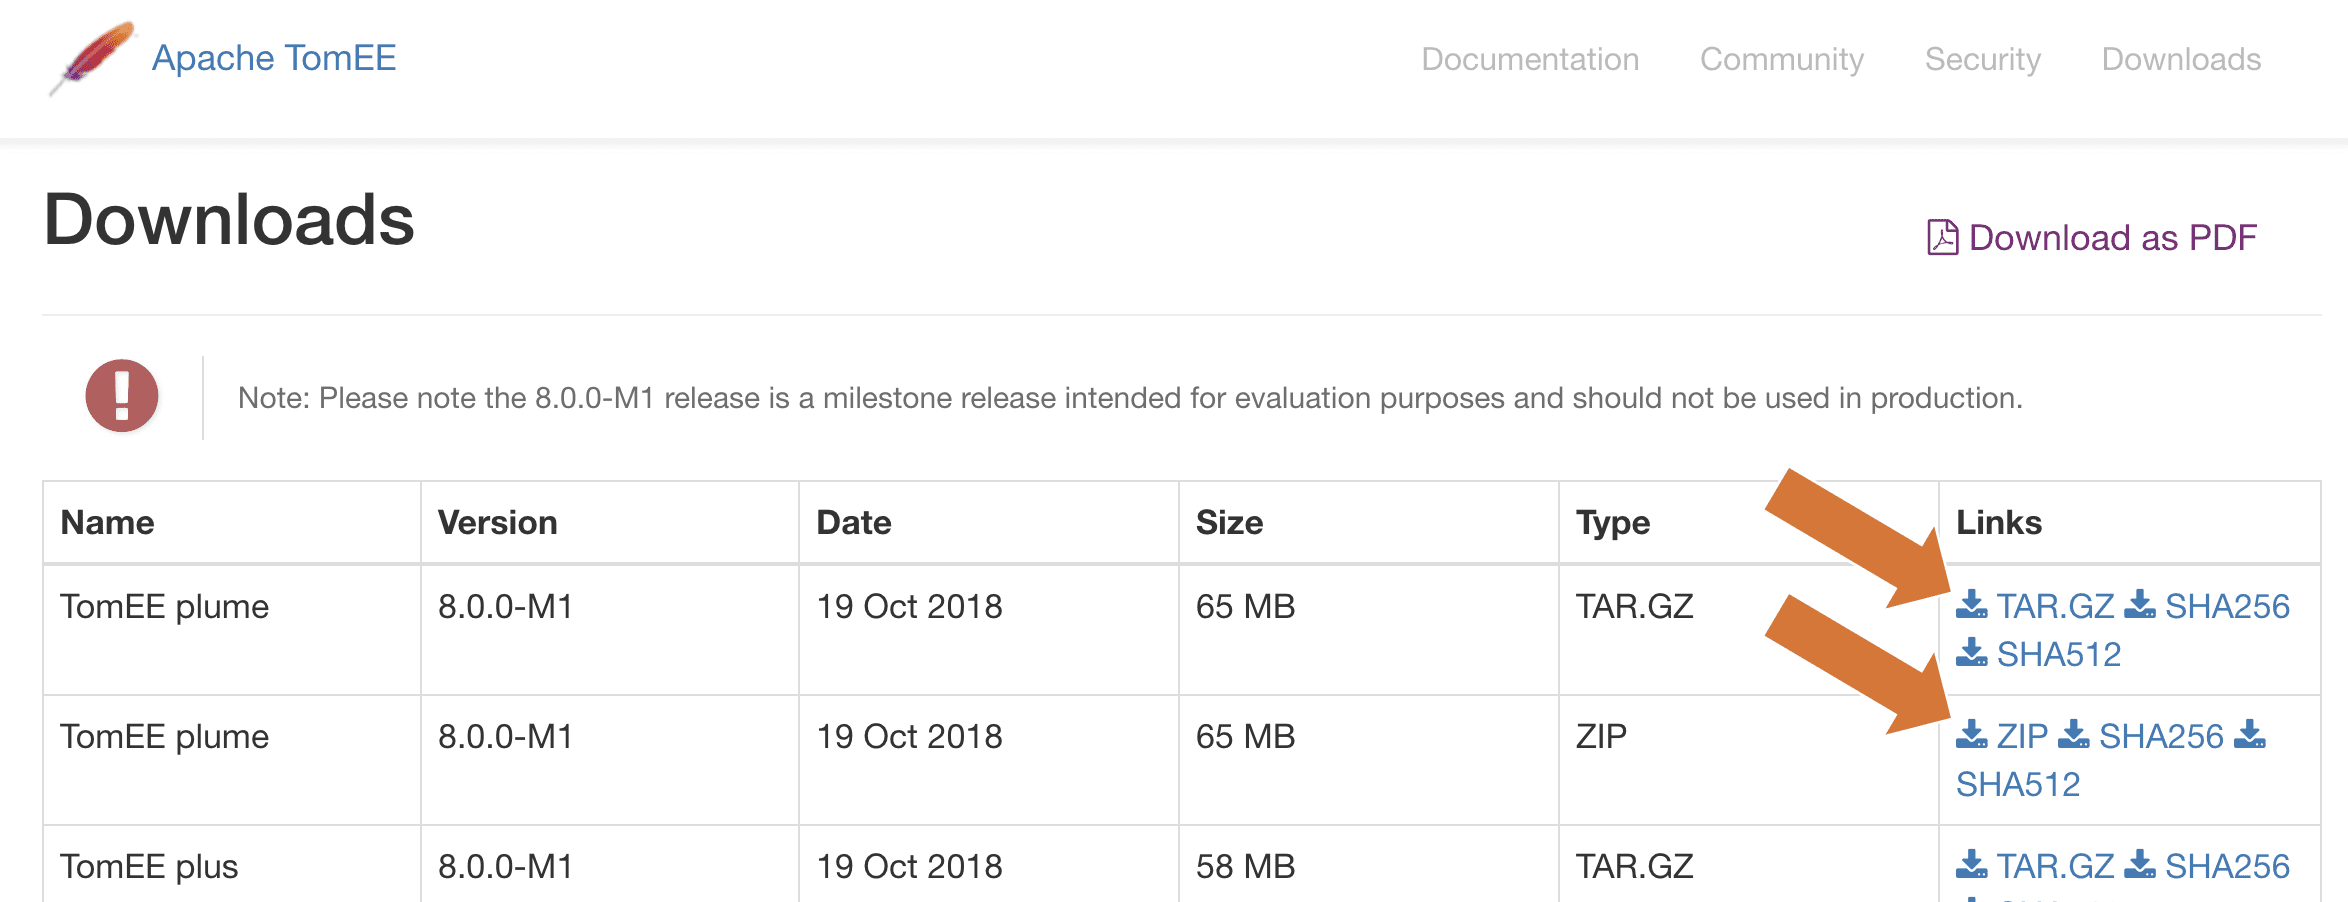
Note: If you are wondering what the difference is between the various TomEE platforms, check out this page.
2. Extract the TomEE Archive
You can choose a different directory if you prefer, but the tutorial will assume you are using the desktop.
- Move the archive to your desktop and expanded or unzip it. You should now have a directory with a name like “apache-tomee-plume-<whatever version>” on your desktop.
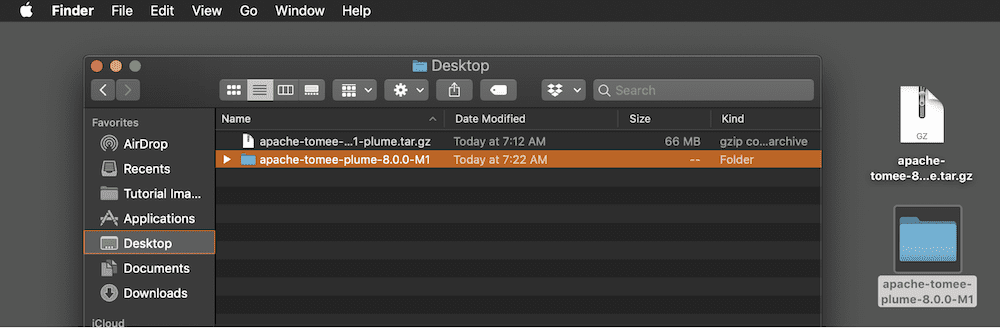
WARNING: Don’t rename the TomEE directory. When I did that, thinking it would make things simpler, the command to start TomEE would not work.
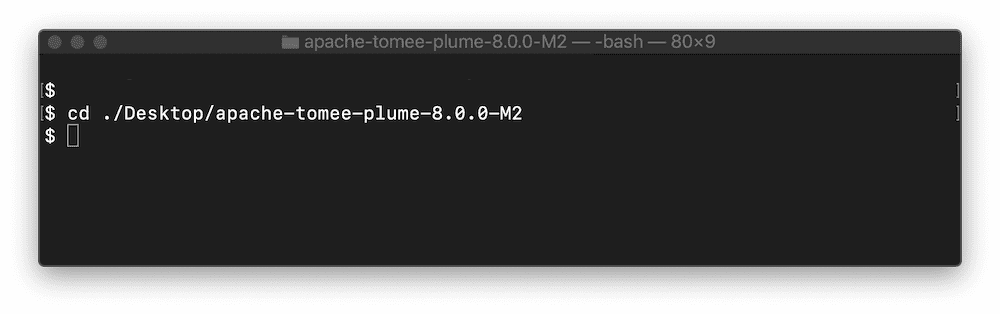
3. Open up a command line prompt and navigate into the apache-tomee-plume directory.
- On Mac OS X navigate to or search for the “Terminal” and open that. Then go to the
apache-tomee-plumedirectory using this command$ cd ./Desktop/apache-tomee-plume-<whatever version>.
4. Start TomEE to make sure it’s working.
- On Mac OS X execute the following command
$ ./bin/catalina.sh run

- If you see the output shown below, then all is well – notice that TomEE started very quickly (in my case in less then 1000 ms or 1 second)!
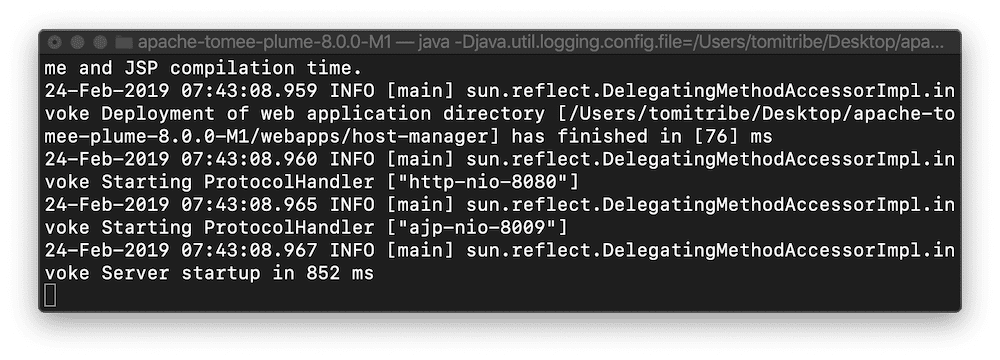
Note: Catalina in part of Apache Tomcat and is used to start, stop, and manage the Tomcat server. TomEE is built on top of Tomcat so starting Tomcat, in this case, also starts TomEE.
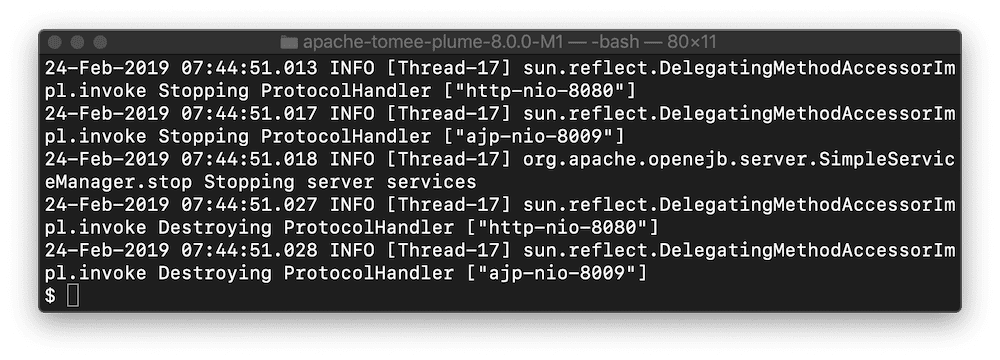
5. Stop TomEE
You will need to stop TomEE now so that IntelliJ can start it for you later. If you don’t stop it now, then when you try to run it from IntelliJ it won’t work.
- On Mac OS, make sure the Terminal app is active and type Cntrl + C and hit the return button.
Section 2: Download and Install the IntelliJ IDEA Ultimate
If you have the community edition of IntelliJ you can follow along but I can’t guarantee that it has the features needed. I only tested with the Ultimate edition. Even if you don’t have Ultimate you can get a free trial download which is all you’ll need for this quick tutorial.
1. Download the IntelliJ IDEA Ultimate IDE
- Find the IntelliJ Ultimate download link on this page.
- There are three operating systems that IntelliJ supports: Mac OS, Windows, and Linux. Select the right one for you.
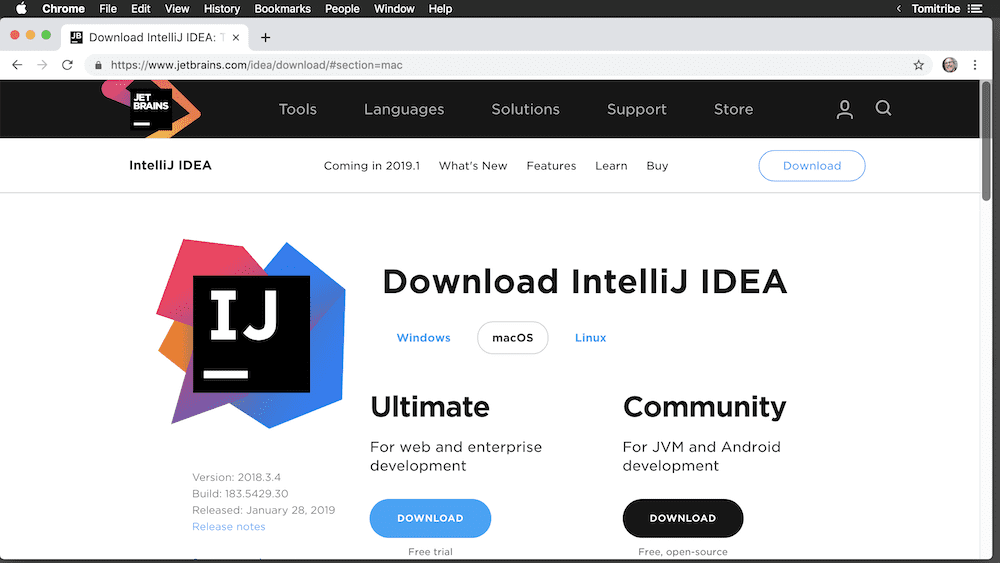
Note: If that link is broken (navigation can change now and then) just google “download ‘IntelliJ IDEA’” and you should find it.
2. Install the IntelliJ IDEA Ultimate IDE
After you download the IntelliJ go ahead and install it as you would any other software.
Section 3: Create an IntelliJ Java Enterprise Web Project
The next step is to create an IntelliJ project that is the foundation for a Web app that you will run and debug on TomEE.
1. Create a new IntelliJ Project
A lot of the work is taken care of when you create a Java Enterprise project in IntelliJ.
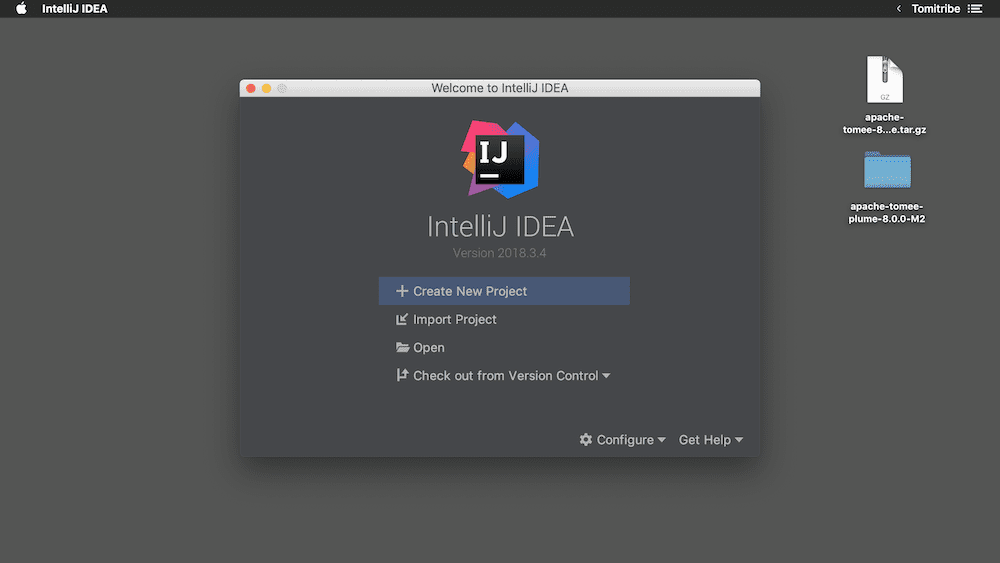
- Open the IntelliJ application
- Select “Create New Project” from the Welcome Screen
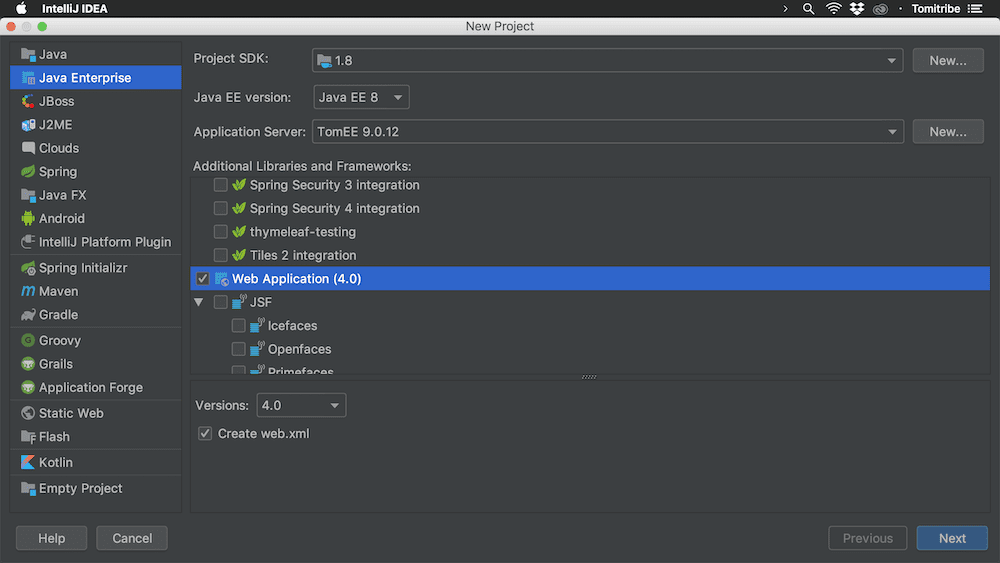
2. Select the IntelliJ Java Enterprise Web Application Project Template
- In the left hand panel, select “Java Enterprise” as the project type

- In the “Additional Libraries and Frameworks” section on the right pane, scroll down and click on “Web Application”
- And then click the “Next” button
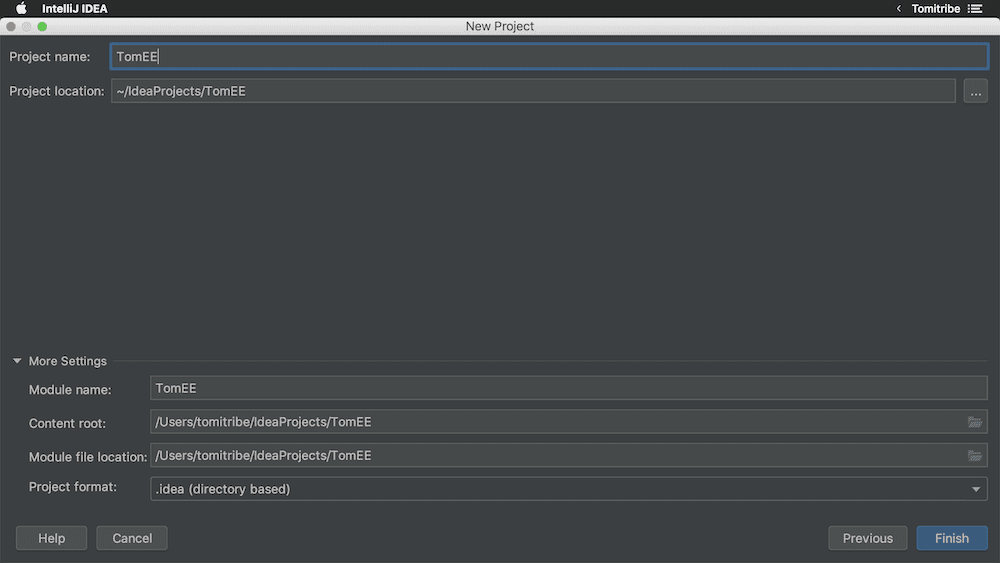
3. Name the IntelliJ project and generate initial code
- For the project name, enter “TomEE”
- Click the “Finish” button
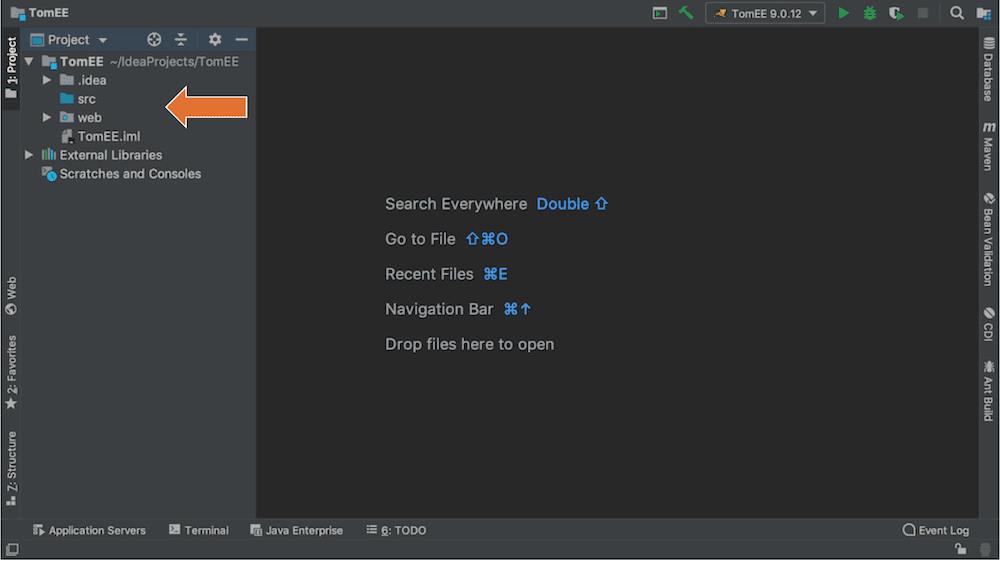
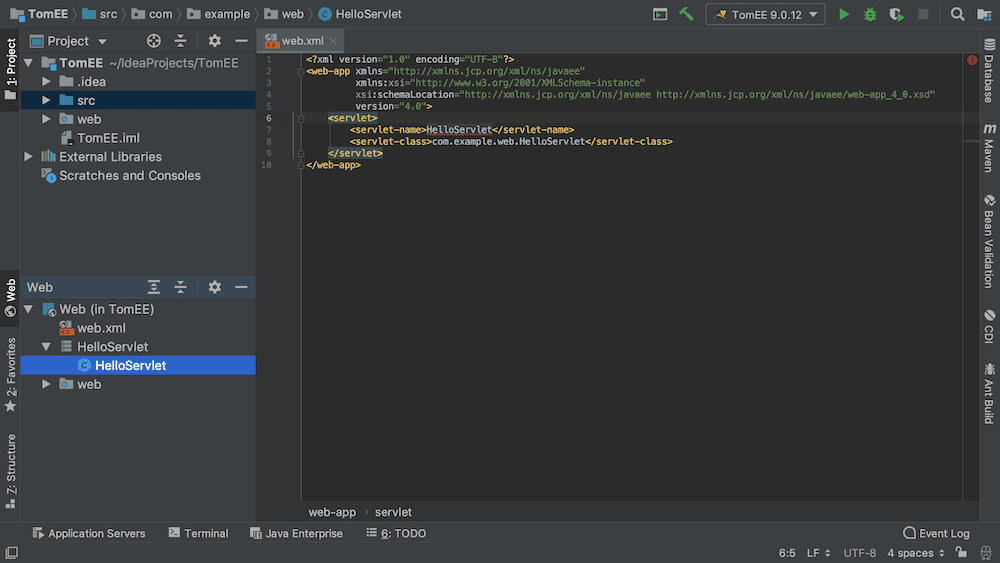
A Java Enterprise skeleton project is generated with a very simple Web application. If you expand the TomEE project folder you’ll see a number of directories. We’ll be working with the src and web directories in the next section.
Section 4: Create a Web App to run on TomEE
Now that you have a project you just need something to debug. For this tutorial, we are going to create a simple Servlet Web App.
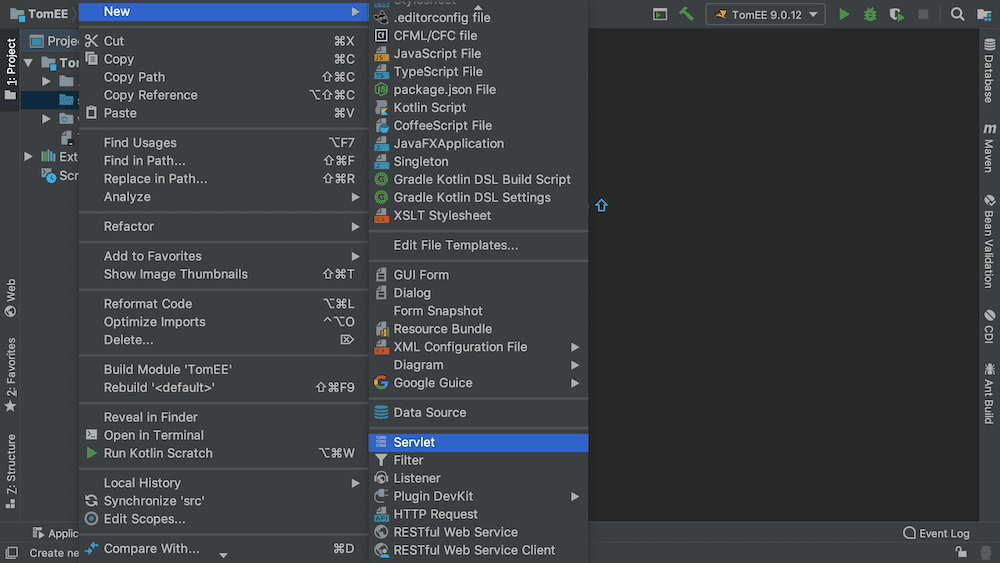
1. Name and generate the Servlet Web App
- Right click on the src directory and select New
- Scroll all the way down and select Servlet
You should now see a “New Servlet” dialog.
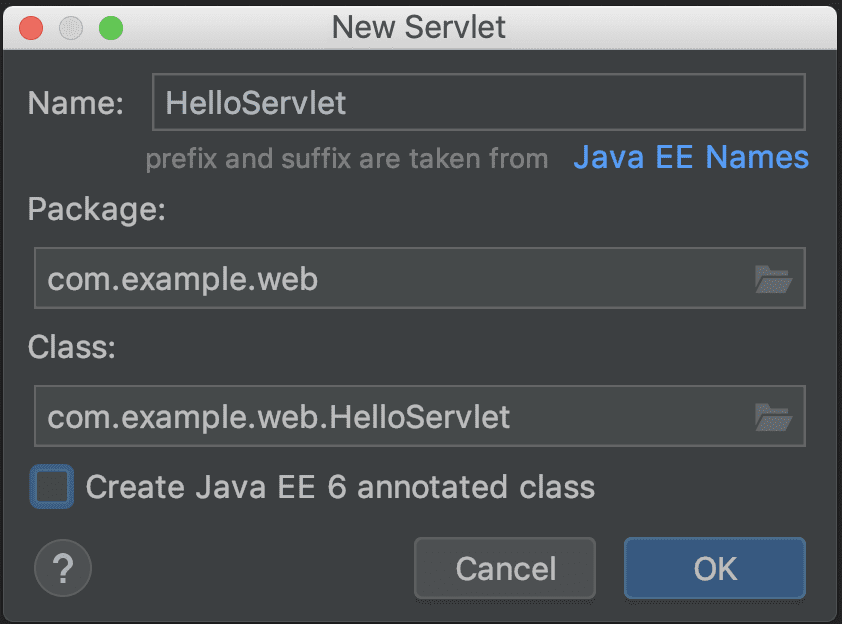
- Enter “HelloServlet” for the Name
- Enter “com.example.web” for the Pakcage Name
- And then click on the “OK” button
Note: When I first did this I skipped entering a package name and as a result IntelliJ didn’t generate the correct web-app configuration file, so you need to put something in there. Normally its a reverse domain address.
2. Modify the Servlet’s web-app file
When you generate a Servlet, IntelliJ automatically creates the web-app XML file. This configuration file will be delivered to the TomEE server along with the compiled Servlet. The web-app file should already have identified the servlet class in the <servlet> element.
Now you need to give the servlet a lookup name and tell TomEE how that servlet maps to a URL in Tomcat. We’ll do this by adding a <servlet-mapping> element. Fortunately, code completion in IntelliJ makes this very easy.
- Start typing
<servletand IntelliJ’s code completion will provide you with a couple of options. - Select the
<servlet-mapping>option and hit return
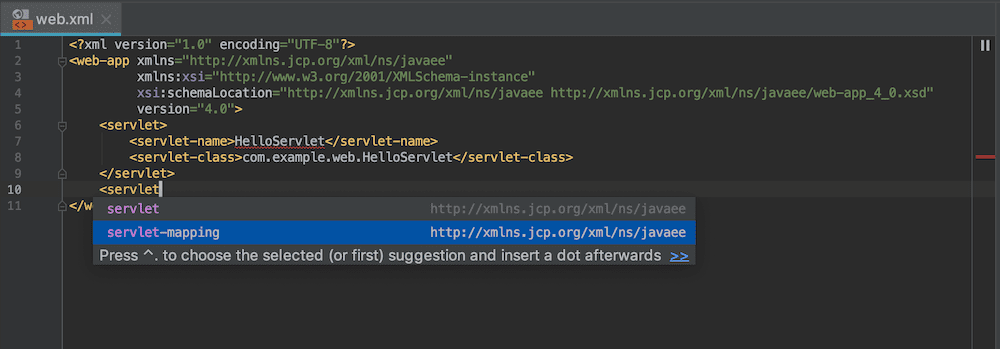
- Enter “HelloServlet” into the
<servlet-name>element. - Enter “/*” into the
<url-pattern>element.
The url-pattern tells TomEE that the Servlet can be accessed by simply entering the project name into the URL … No need to be more specific than that. You’ll see this later in the tutorial.
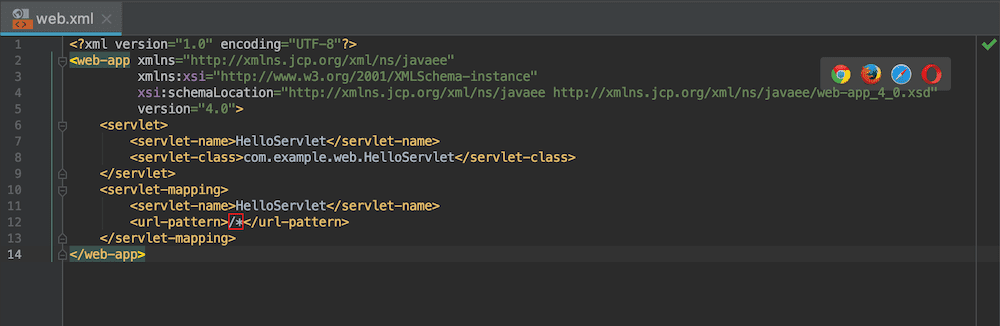
Note: Enter the forward slash followed by the asterisk ( /* ) as shown otherwise you won’t be able to invoke the servlet when following this tutorial
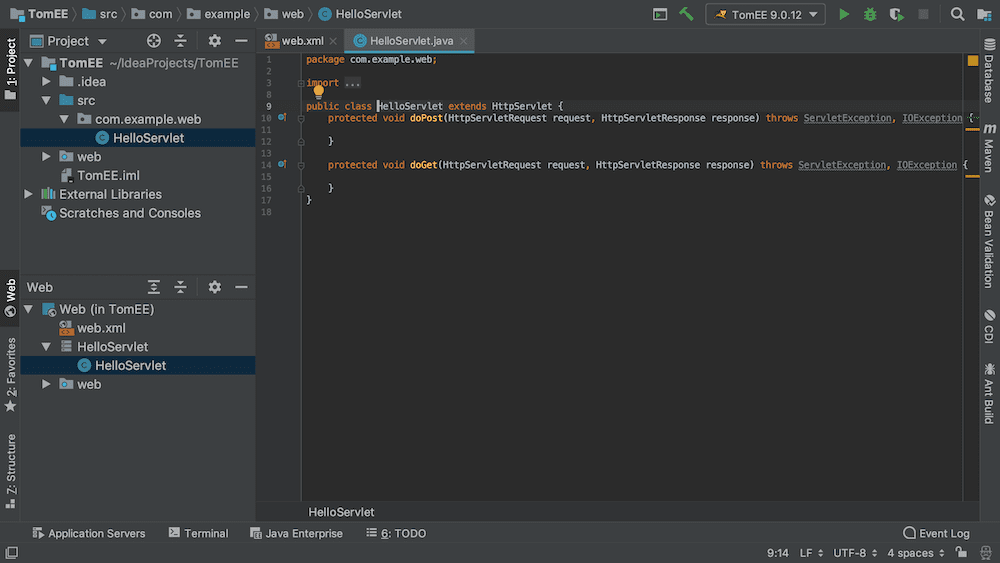
3. Modfy the HelloServlet code
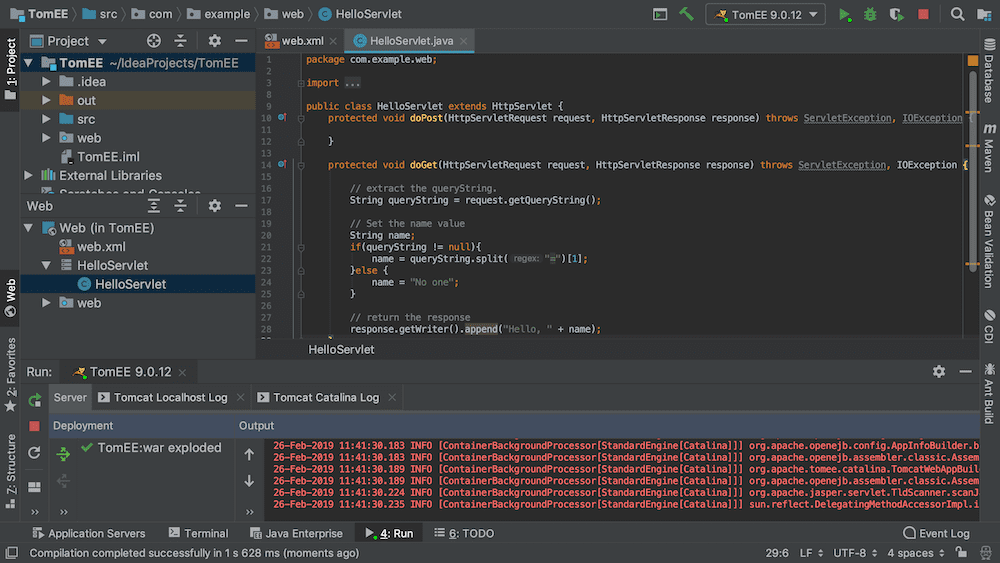
When you have finished editing the web-app file, expand the src directory until you can see the HelloServlet.java file and click on that. You should now see your HelloServlet class with empty doPost() and doGet() methods.
When you connect to a web site with a browser, the browser sends a HTTP GET message to the web server. This message contains the address of the web page wanted along with some metadata. The Servlet component is designed to handle that HTTP GET call using the doGet() method. We are going to edit that code to return some text when the Servlet is invoked.
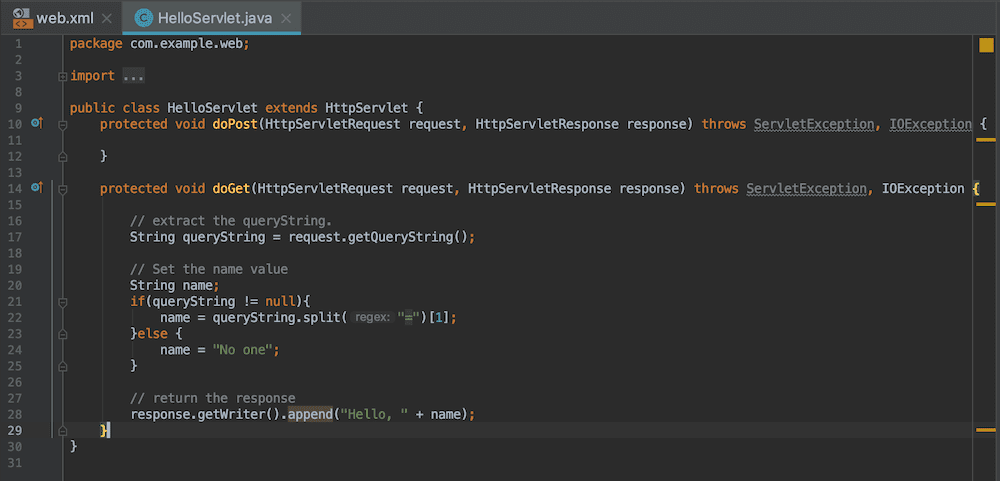
- Replace the
doGet()method with the following
protected void doGet(HttpServletRequest request, HttpServletResponse response) throws ServletException, IOException {

    // extract the queryString.
    String queryString = request.getQueryString();

    // Set the name value
    String name;
    if(queryString != null){
        name = queryString.split("=")[1];
    }else {
        name = "No one";
    }

    // return the response
    response.getWriter().append("Hello, " + name);
}
The purpose of this code is to check for a query string and if it exists to look for the name-value pair, name=<whatever> and return “Hello, <whatever>”, or if there is no matching name-value pair to return “Hello, No one”. The Response object that it uses simply feeds the text in the append() method to Tomcat for it to send back to the client.
When you have finished editing the HelloServlet, the IntelliJ code editor should look as follows:
Section 5: Connect IntelliJ to TomEE
Now that our HelloServlet is coded we can configure IntelliJ so that it will deploy the servlet to the TomEE installation directory that we put on the Desktop earlier.
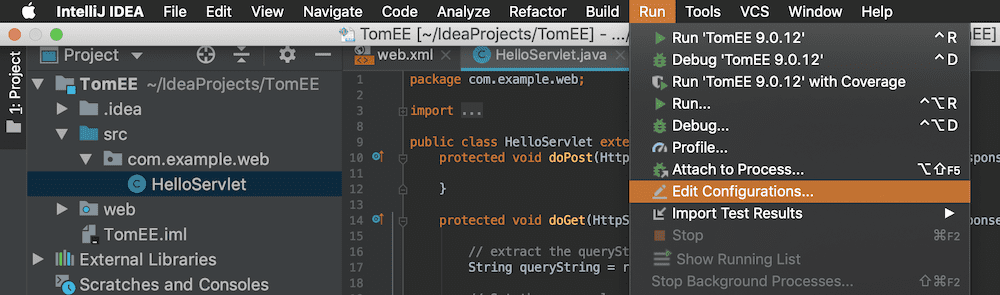
1. Open the Run/Debug Configuration window
- In the IntelliJ menu select Run – Edit Configuration …
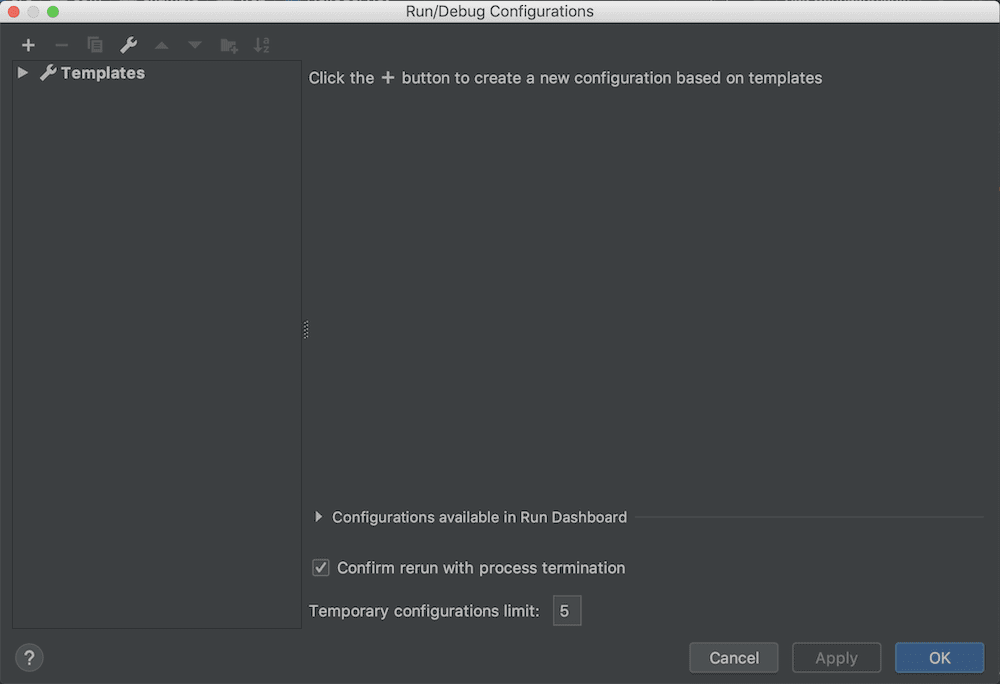
The “Run/Debug Configurations” dialog box is where we tell IntelliJ what type of application server we are using and where it’s installed.
2. Select the TomEE application server
At the top left corner of the dialog is a plus ( + ) symbol. Clicking on this is going to open all of our server options and fortunately for us, IntelliJ comes prepackaged with several different Java EE application servers including TomEE!.
- Click on the plus ( + ) symbol
- Scroll down the list until you come to TomEE
- Select TomEE Server – Local
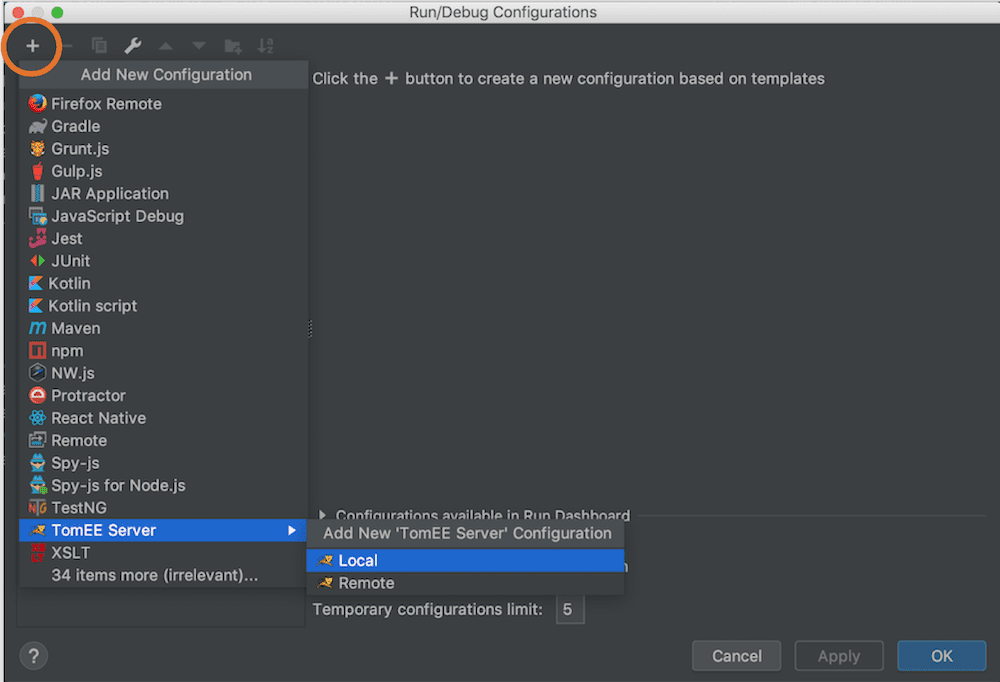
Note: IntelliJ comes with a plethora of options here and when I used it TomEE was pretty far down the alphabetical list. You might have to click on a “expand options” menu item at the bottom of the screen to find it.
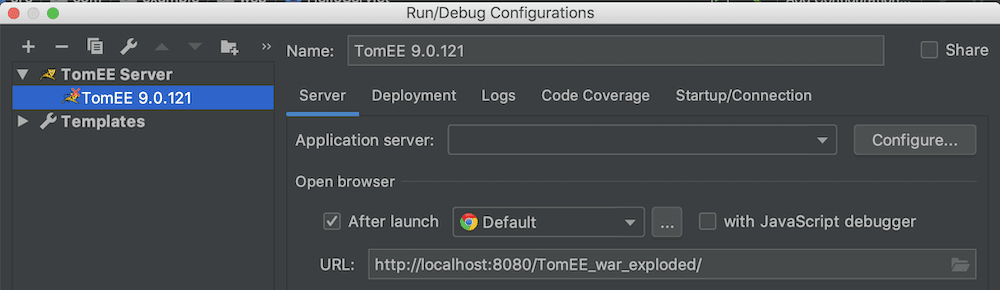
You will notice right away that the list on the left pane disappears and is replaced with the TomEE Application server (version 9.0 here). That means you successfully told IntelliJ the type of server you are using and the fact that it’s on the same machine as the IDE.
3. Declare the TomEE deployment directory
You can also see that the right-hand pane in the dialog fills up with all kinds of deployment fields. Most of these will be filled in for you, but we still need to tell IntelliJ where the TomEE application server is installed.
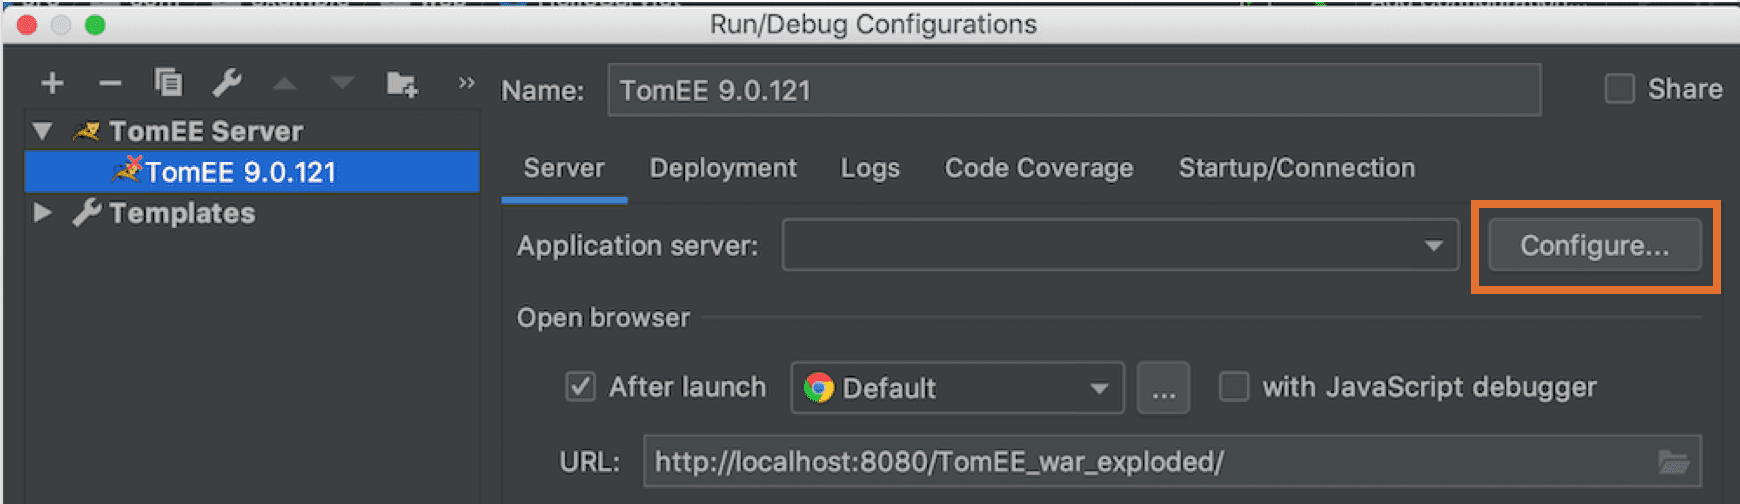
- Click on the “Configure…” button next to the “Application Server:” field.
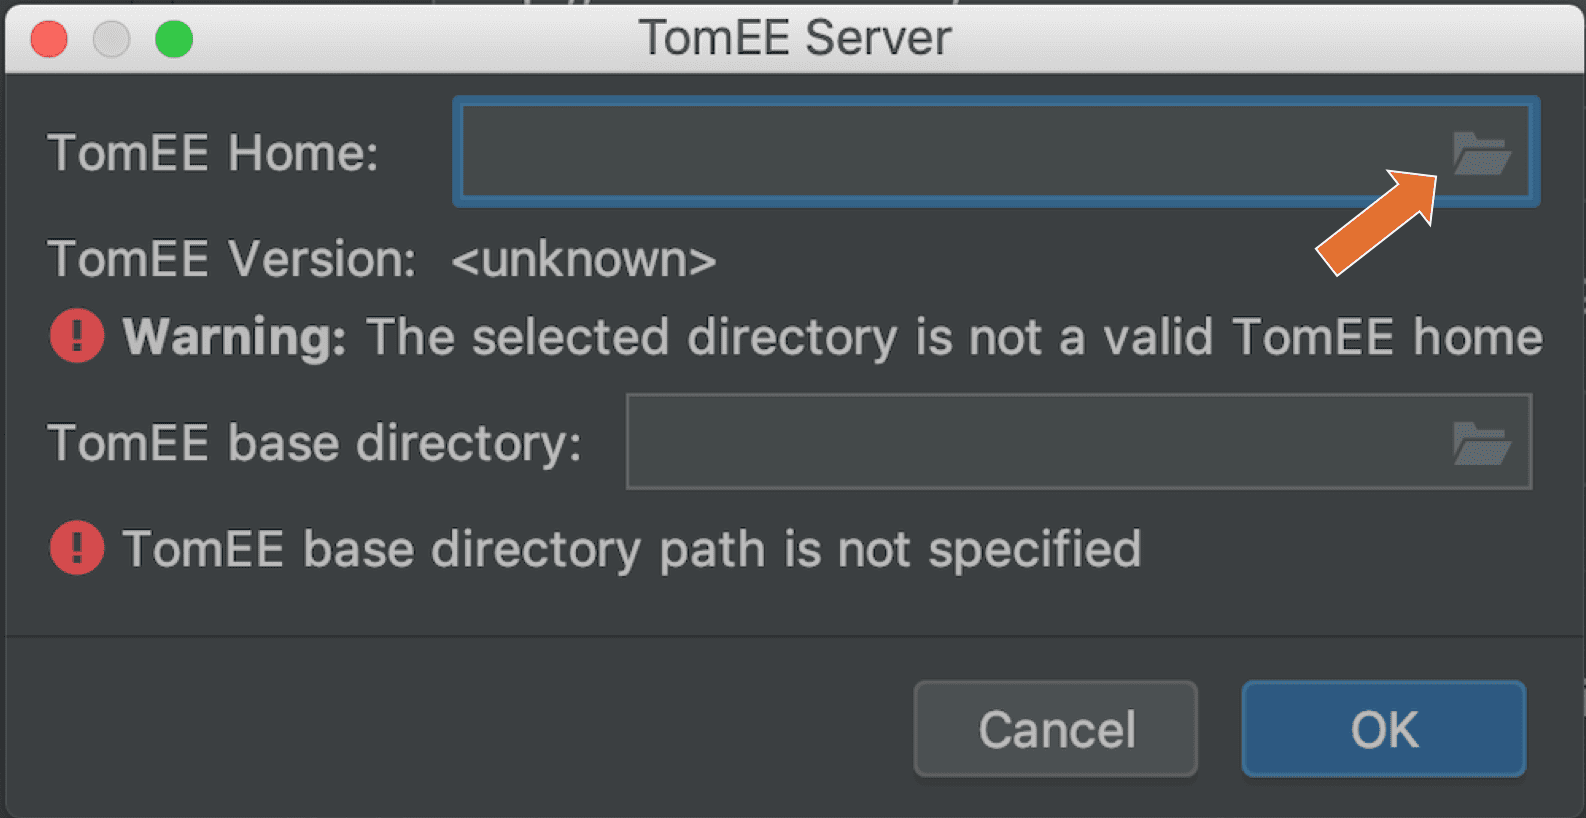
The “TomEE Server” dialog has pretty much one purpose and that is to identify the directory in which the TomEE application server is installed on your machine.
- In the text box labeled “TomEE Home”, click on the little folder icon in the far right to open a file browser
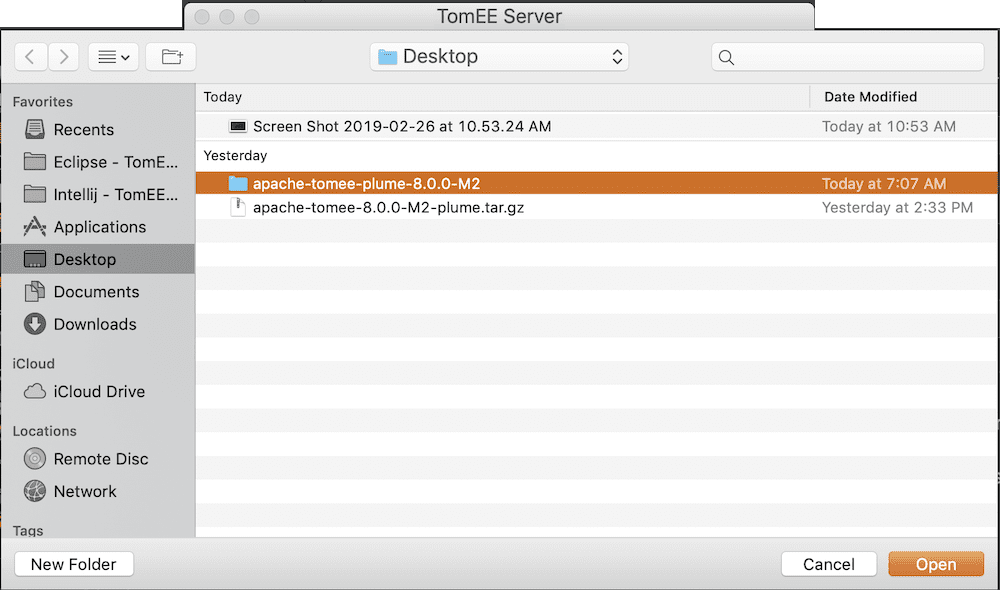
We installed the TomEE application server on the Desktop at the start of this tutorial and it’s that apache-tomee-plume directory that we are interested in now.
- Select the
apache-tomee-plumedirectory and then click “Open”
This completes the TomEE server dialog box.
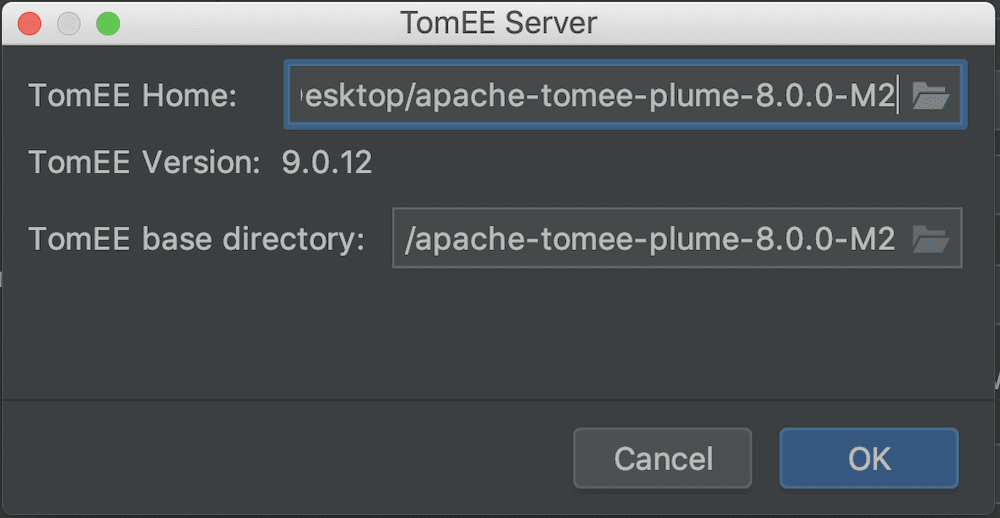
- Click the “OK” button to close the dialog box
4. Delcare the TomEE WEB archive
When we return to the “Run/Debug Configurations” dialog box you will notice that the “Application server:” field now contains “TomEE 9.0.12” (it may be different as TomEE versions increase). But also notice at the bottom of the dialog box is a warning that says, “Warning: No artifacts marked for deployment.”
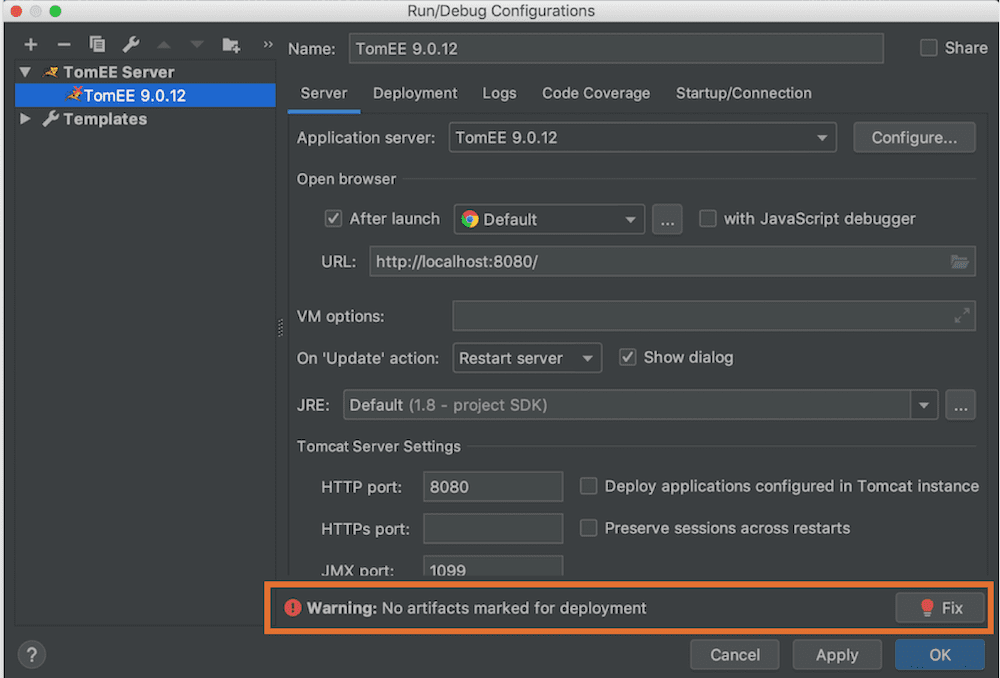
When I first saw that warning, I thought: “What the heck is an artifact?”. It turns out that an artifact is simply a Java Enterprise component. The warning is saying that while we have the server all mapped out we have not selected any application code for it to run.
- Click on the “Deployment” Tab at the top of the dialog
The “Deployment” tab is where the application code you are working on should be specified if you want to run it on the TomEE application server. IntelliJ is pretty smart and knows that we want our HelloServlet Web app deployed but it won’t use that Web app unless you explicitly tell it to do so. Fortunately, this requires very little effort on our part.
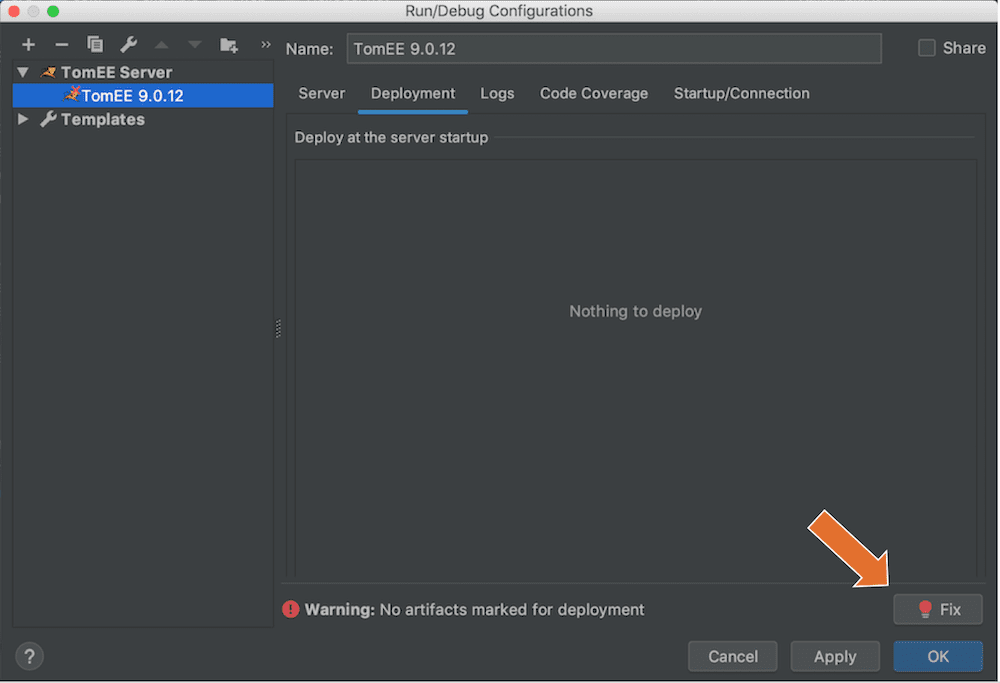
- Click on the “Fix” button on the bottom right of the dialog
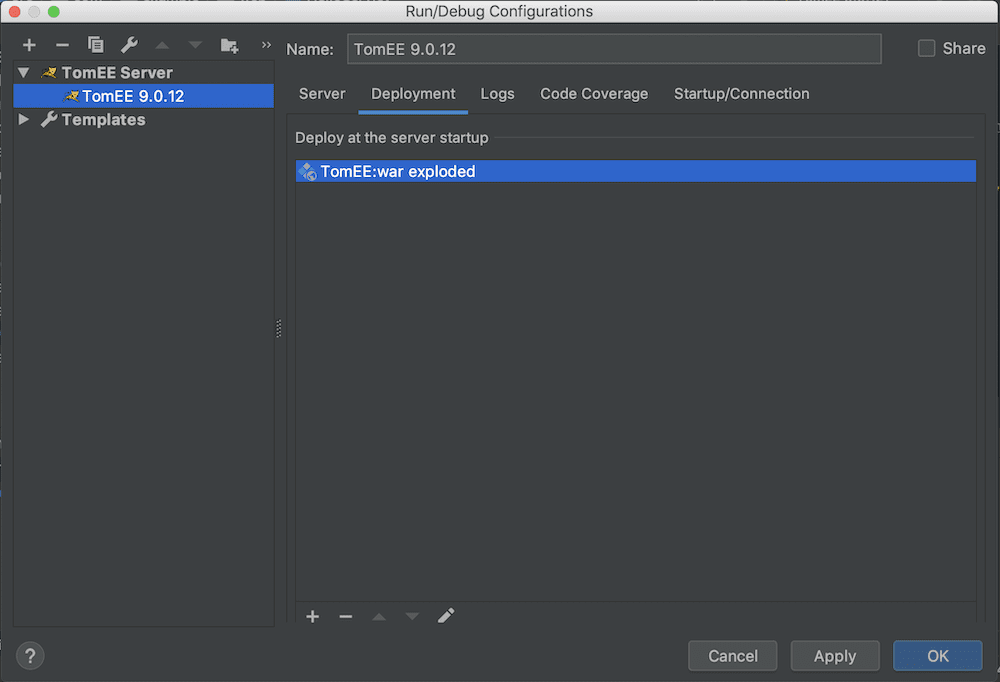
The HelloServlet is automatically packaged up along with the web-app configuration file you edited earlier into a a WAR file, which is just an archive file. When we run the server this WAR file will be deposited in the apache-tomee-plum directory under the webapps subdirectory. That’s where TomEE expects to find enteprise Java code when its running.
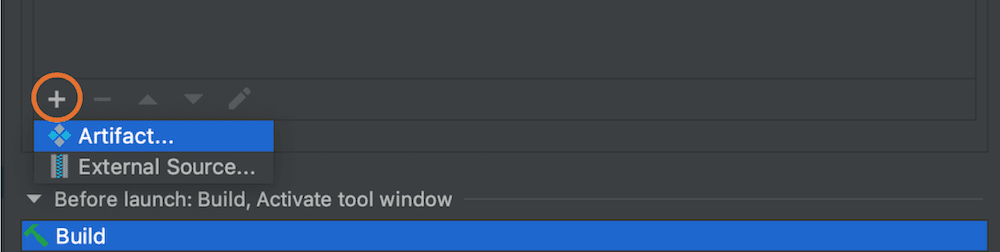
Note: One of the times when I was running this tutorial the warning and the “Fix” button didn’t appear. I don’t know why. But if this happens to you just click on the plus ( + ) button at the bottom left of the “Run/Debug Configurations” dialog box (as shown below) and select Artifact and you will end up with the same result as a fix.
Section 6: Run the Web App in TomEE from IntelliJ
So now that we’ve created and deployed the HelloServlet Web app we have reached the moment of truth when we instruct IntelliJ to run the Web app on the TomEE server.
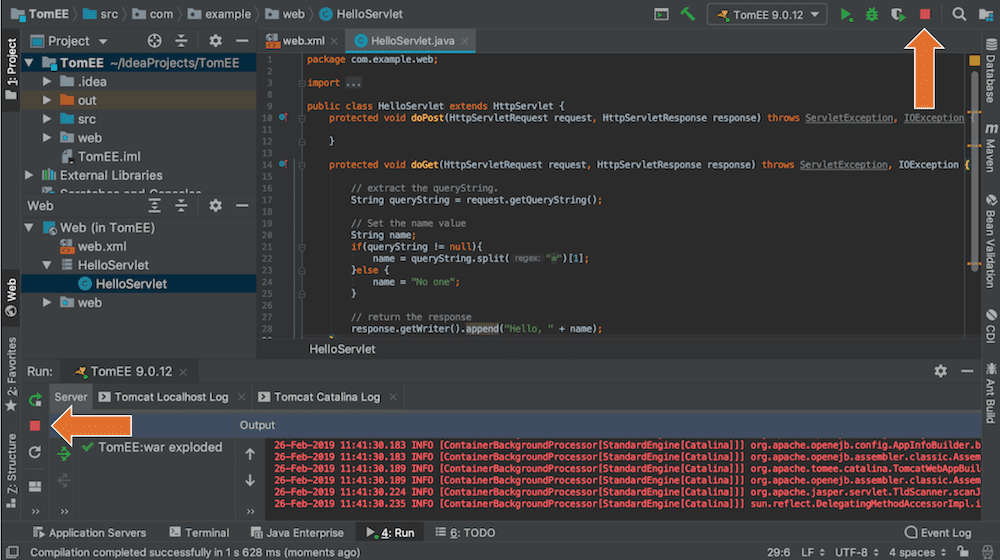
1. Deploy the Web App and Start the TomEE Application Server
This is ridiculously easy. At the top right of the IntelliJ is a little green arrow that we click on to deploy our WAR file, start the TomEE application server, and test out our Web app.

- Click on the green arrow button in the toolbar
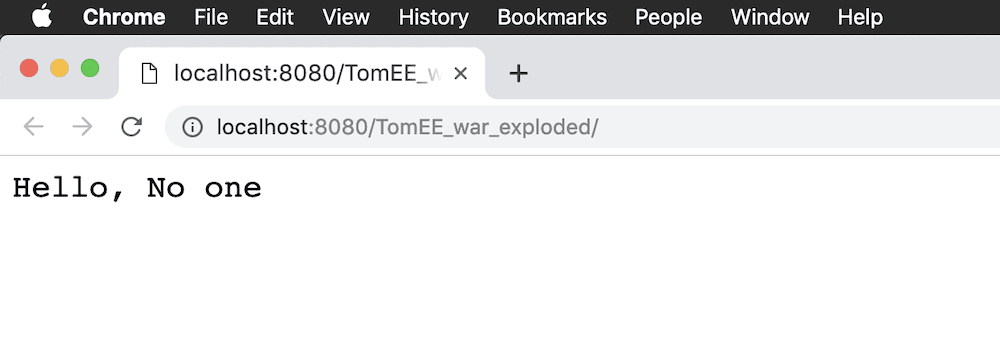
IntelliJ will immediately deploy our Web app and start TomEE and then send the basic URL for our application to your web browser which will in-turn send a HTTP GET message to TomEE. TomEE will then execute the doGet() method on the HelloServlet and return the results to the browser. After IntelliJ cranks on the deployment a bit you should see the browser pop-up with “Hello, No one” as the text, just like you would expect.
Well, that was satisfying. If you go back and look at IntelliJ you’ll see that it has started and run the TomEE application server and printed the output at the bottom panel of the IDE.
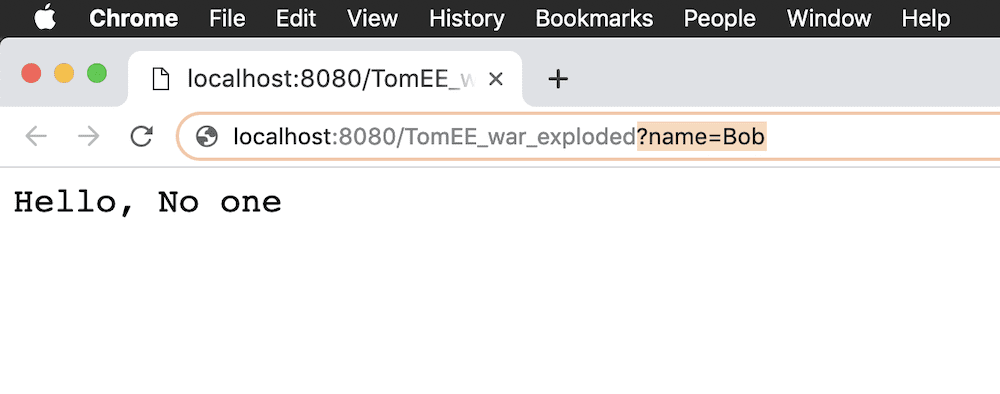
2. Change the URL to include a query string
Let’s change the URL used by the browser so that it includes a query string.
- At the end of the URL “http://localhost:8080/TomEE_war_exploded/” replace the last backslash with the “?name=Bob“
That last bit “?name=Bob” is the query string. The full URL looks like the one shown in the figure below.
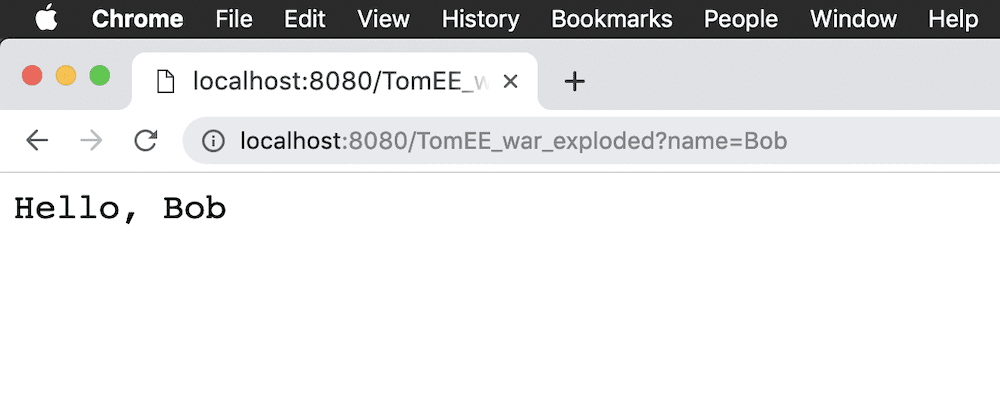
With the query string in place, you are ready to send the request to the HelloServlet Web app running on TomEE.
- Click the browser reload button, or place your cursor in the browser’s URL field and hit return.
Check it out! TomEE passed the request to the HelloServlet Web app which returned “Hello, Bob”! Woot! You did it!
Section 7: Debug the Web App in TomEE from IntelliJ
Now that we know we can run our Web app on TomEE from IntelliJ we can do some debugging. This process is pretty straightforward. Instead of choosing to run TomEE with our Web app we choose to debug our application while it is running on TomEE.
1. Stop the TomEE server
To do this we first have to stop the server from running without the debugger. This is a simple matter of clicking on the square, red stop button which is located on the upper right, next to the green run arrow, and on the far left of the bottom pane.
- Click on one of the red stop buttons now.
2. Set a breakpoint on your application code
To debug your application you are going to set a breakpoint in the code. This is pretty easy in IntelliJ. Like other IDEs, you simply click on the left border of the code window which sets the breakpoint represented by a red dot.
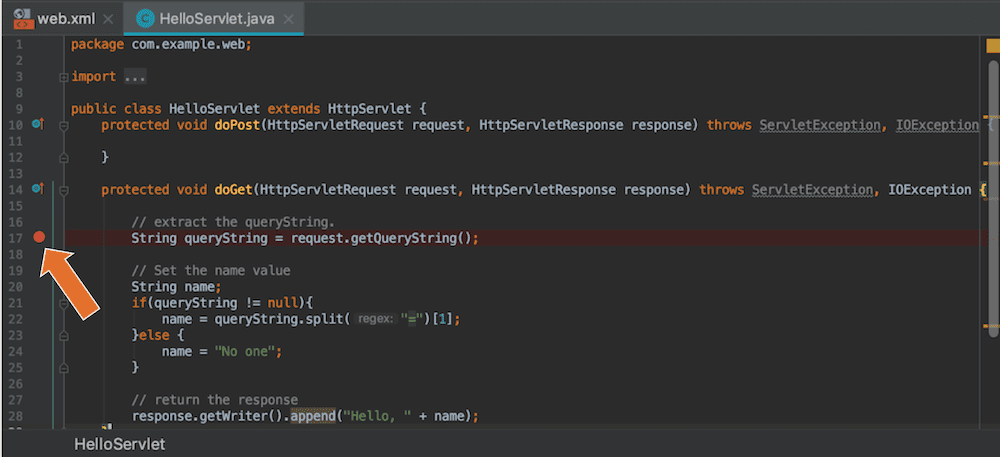
With the breakpoint set, you are ready to run the application on TomEE in the debugger.
3. Run TomEE in the IntelliJ Debugger
To run the TomEE with the debugger just click on the button with the green bug-like symbol in the upper right of the toolbar on IntelliJ.

- Click on the debug button now
The debugger deploys the Web App to TomEE with the breakpoint set and then starts up the server and processes the HTTP GET request. It hands off the request to the doGet() method of the HelloServlet and then it stops at the breakpoint.
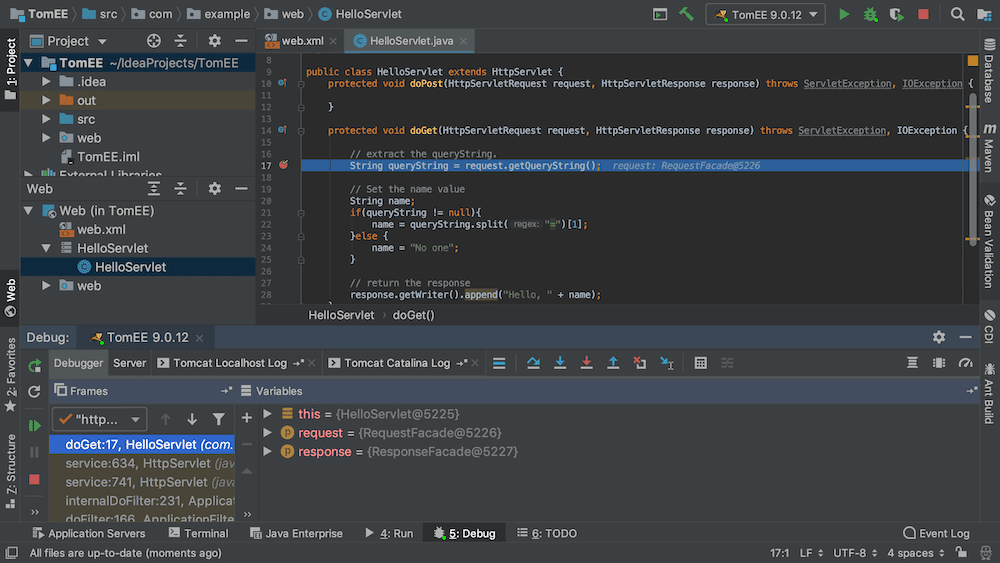
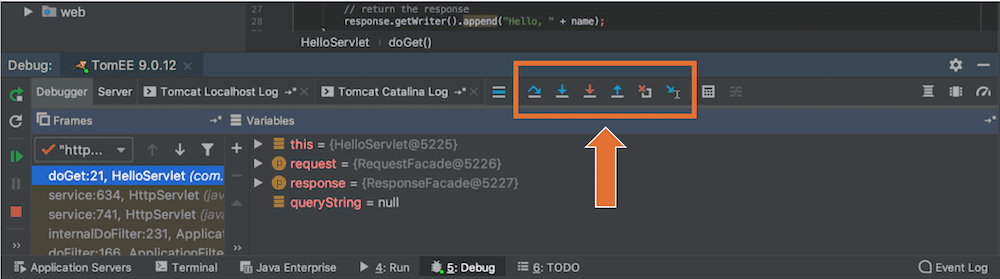
You can step through the breakpoint, view variables, and everything you would expect with a debugger and see exactly how your application code is behaving at runtime. The controls for debugging are located on the top toolbar of the bottom panel.
I’m not going to go into details here about how to debug in IntelliJ, that’s a whole topic of its own. However, JetBrains, the makers of IntelliJ, have a nice set of tutorials on the subject which I found helpful.
Congratulations!
You have successfully installed TomEE and connected to it for debugging with the IntelliJ Ultimate IDE! That was pretty cool, right?
In the future, we are going to post a more advanced article on debugging TomEE from an IDE when its located on a remote server – like in the cloud. Stay tuned!