
In the last installment, “It’s Easy! Your First TomEE Pull-Request: Using JIRA”, we showed you how to discover and get assigned a task in the TomEE open source project.
This article, broken up into two parts, shows you how to get set up so you can start contributing and how to use Git to preserve your changes and save them up to your GitHub account.
Section 1: The Contribution Workflow Overview
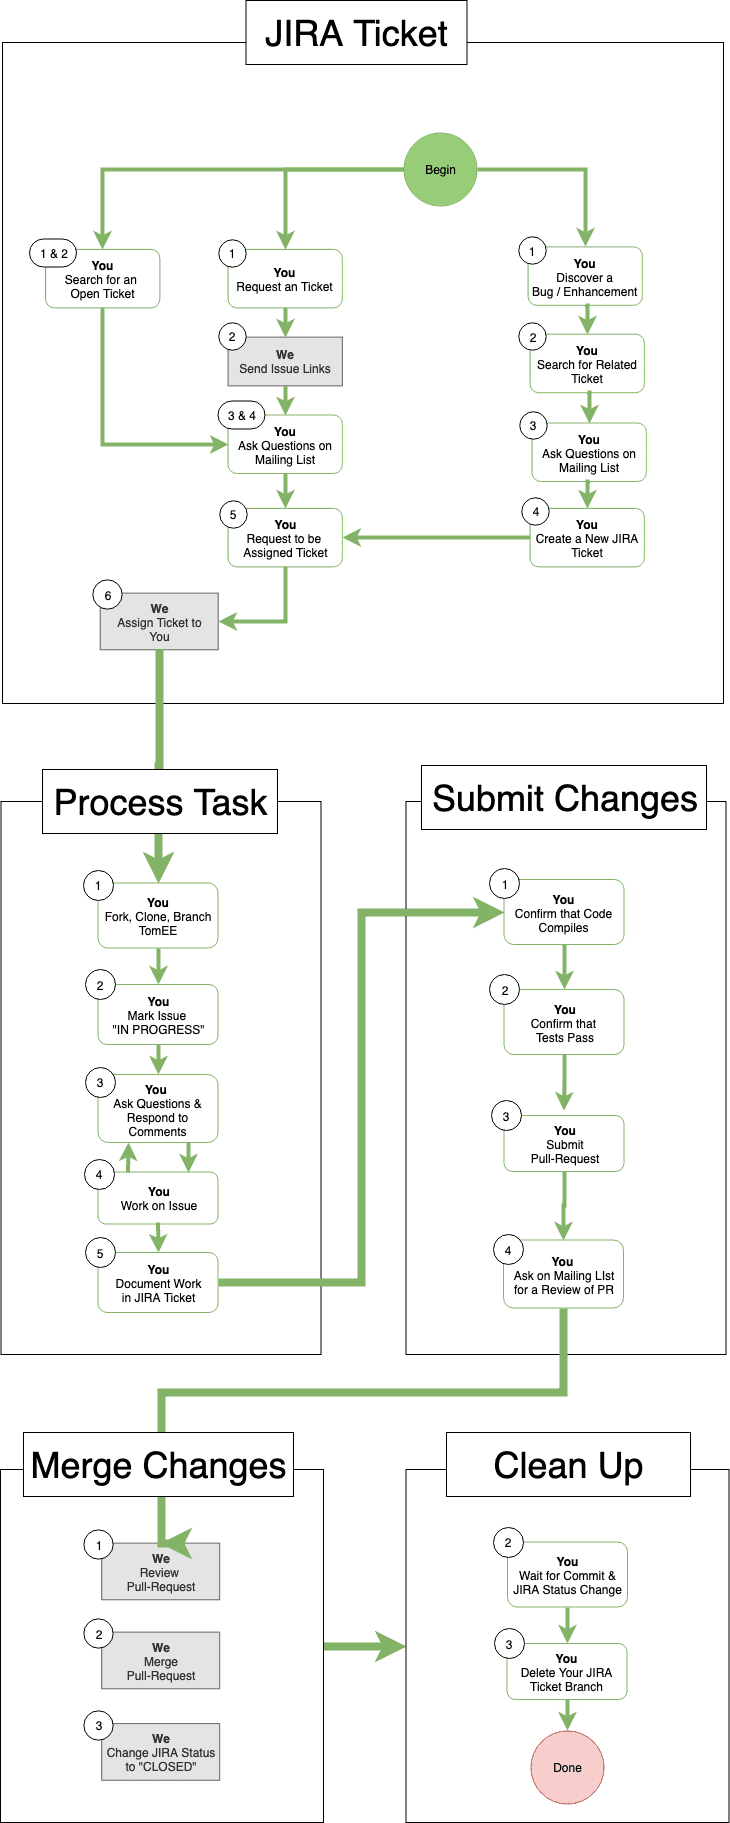
TomEE has a process called the Contribution Workflow that we follow to ensure that everyone is on the same page and that everything is clear and open. The Contribution Workflow includes five sub-processes: JIRA Ticket, Process Task, Submit Changes, Merge Changes and Clean up.
In the last installment, we covered the “JIRA Ticket” sub-process in detail. In this article, we are going to take a deep dive into “Process Task”. Before we get started a quick review of all the processes can be helpful – if you know it already then feel free to skip ahead to Section 2.
1.1 JIRA Ticket
The JIRA Ticket sub-process is all about discovering issues that need work. In TomEE we try to ensure that every bit of work is identified and detailed in JIRA tickets. This sub-process shows how to find issues to work on and the process for initiating work on those issues. The JIRA Ticket sub-process was covered in detail in the article “It’s Easy! Your First TomEE Pull-Request: Using JIRA.”
1.2 Process Task
This is where you do the actual work. Where you get the source code or source documentation, do the work, and document that work in a JIRA ticket. The Process Task is the subject of this article and is covered in detail starting in “Section 2: Process Task”.
1.3 Submit Changes
In this part, you make sure that your code compiles and passes unit tests and then you submit what is called a “Pull-Request” (PR) asking for your work to be reviewed and added to the TomEE project.
1.4 Merge Changes
This is where your work is actually added to the TomEE code-base or documentation. This is ultimately your goal: To produce code that improves TomEE and is included in the project.
1.5 Clean Up
This is the last stage in the process and is just as important as any other. Cleaning up after you are done contributing code is like doing the dishes after serving a wonderful dinner. It’s the less exciting but all too necessary part of the process. After you are done with your work there are some things you need to do to clean up and leave the place nice and tidy for the next person.
Section 2: Process Task
The Process Task portion of the Contribution Workflow is where you do the work on an issue (bug fixes, enhancements, tests, documentation) after getting assigned a JIRA ticket. This is where the rubber meets the road; where the actual work of writing or coding a solution takes place.
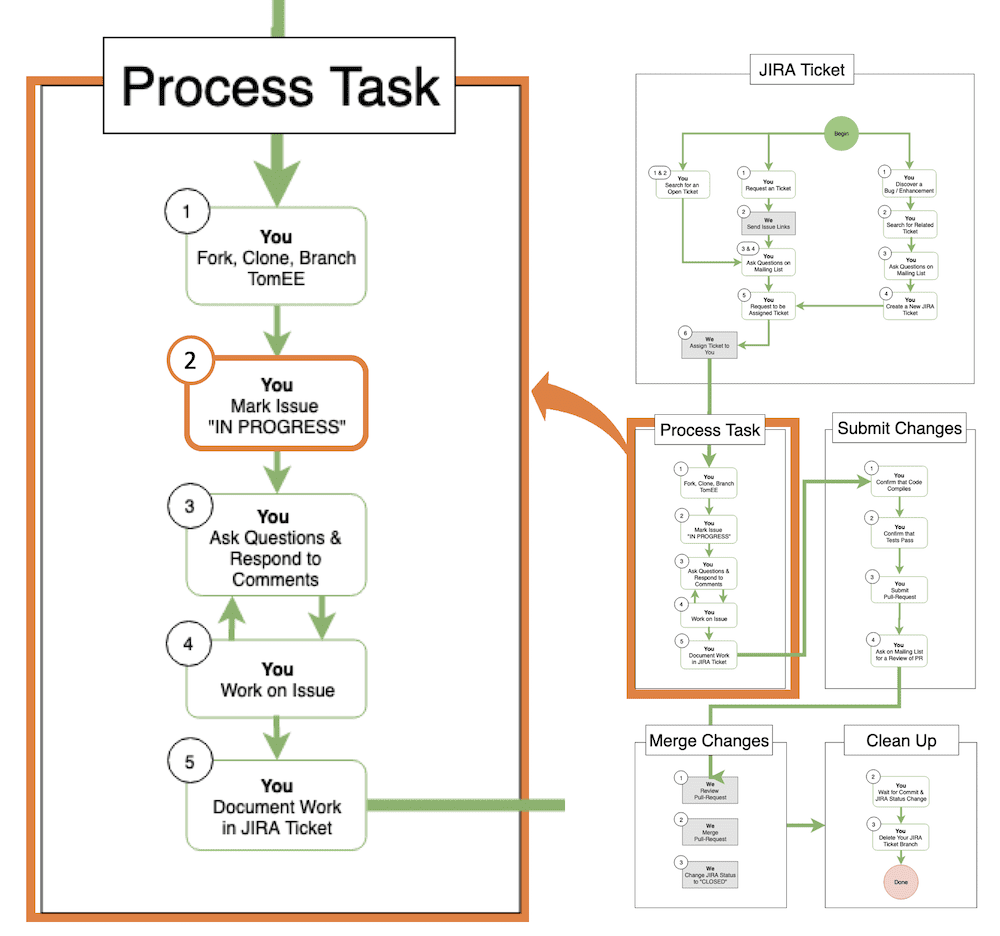
The following diagram shows how the Process Task portion of the Contribution Workflow fits into the whole.
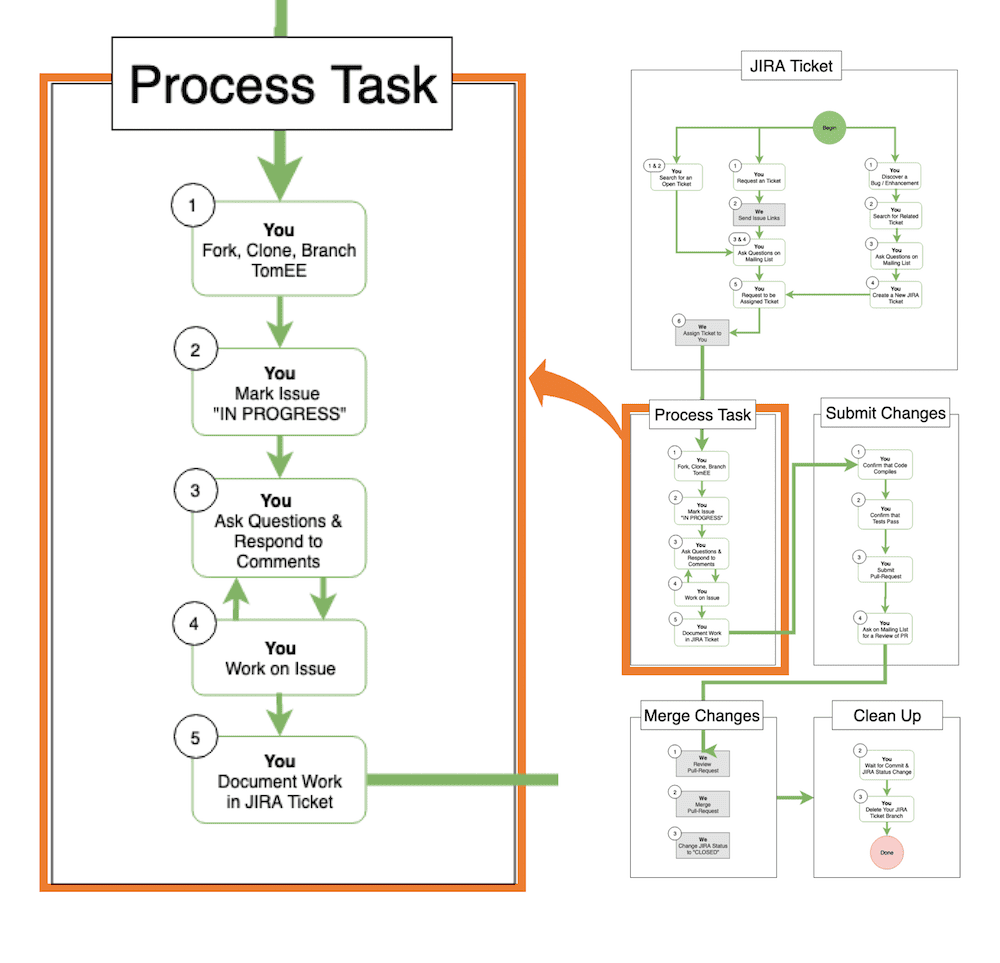
The Process Task portion of the Contribution Workflow has five steps: Fork-Clone-Branch, Mark JIRA InProgress, Ask Questions, Do-the-Work, and Document-the-Work. Let’s cover each step in detail so that you know exactly what to do when you have been assigned a JIRA task.
2.1 Fork, Clone, Branch TomEE
 “Fork, Clone, Branch” is the mantra of every contributor making changes to the TomEE code base or documentation.
To Fork means to copy the Apache TomEE project to your own GitHub account so that you can work on the project without interfering with the work of others. To Clone means to copy your fork of the TomEE repository to your personal computer so that you can work on it locally. To Branch is to create a version of your clone that you can modify and then submit to be included in the main TomEE repository using what is called a Pull-Request. All this sounds more complicated than it actually is so don’t be intimidated.
2.1.1 Fork
When I first learned about “Forking” a GitHub project I thought it was synonymous with “Forking” an entire community. For example, there are many different Unix-like operating systems (e.g. Linux, BSD, Mac OS X) which are sometimes called Forks. In our case, we don’t want to make a new TomEE community, we simply want to get our own copy of the TomEE project so that we don’t accidentally cause problems with the main project.
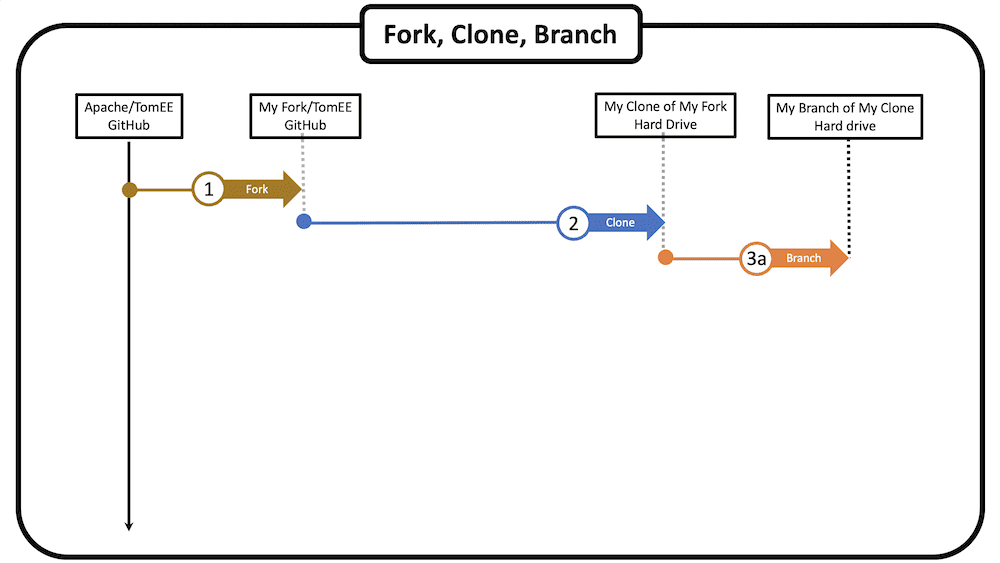
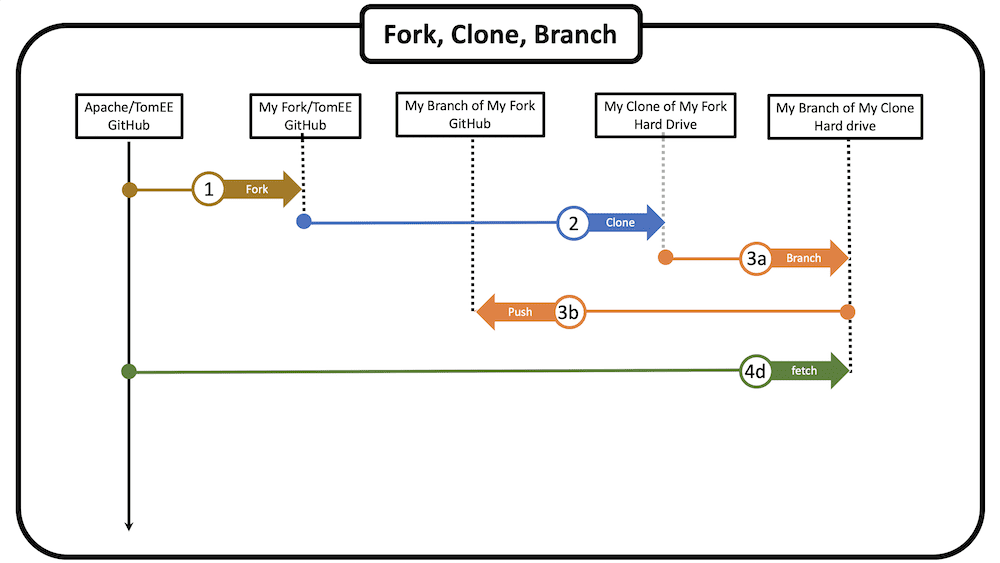
I put together a sequence diagram for Step 1, “Fork, Clone, Branch”, to help understand the process better. The first operation in the sequence is to Fork the project as shown below.
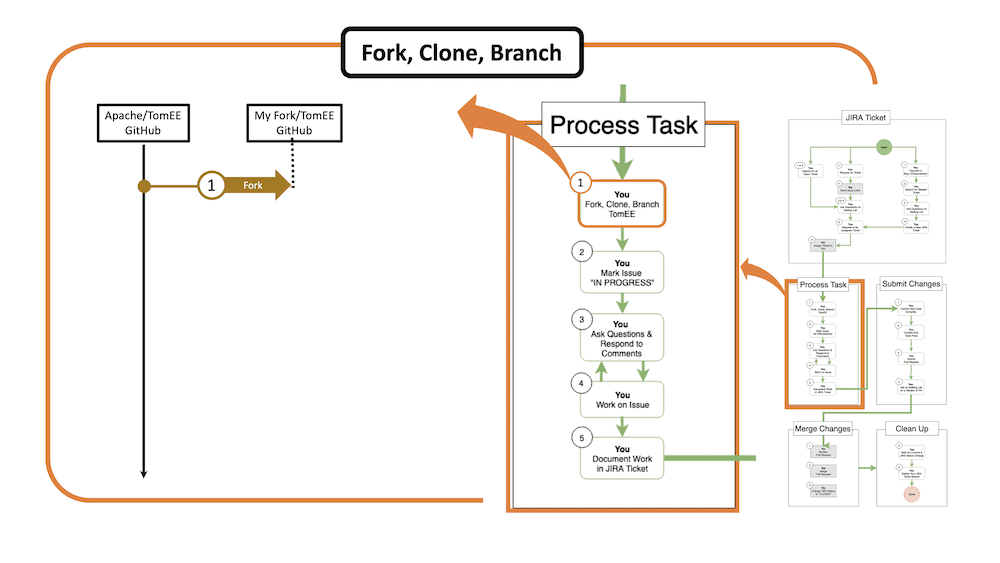
In an earlier installment of the “It’s Easy!” series, “It’s Easy! Get the TomEE Source Code and Join the Community”, we covered in detail how to create a GitHub account and Fork the TomEE project. If this concept is new to you read “Section 1: Getting the Source Code” in that article before you actually do a Fork. Once you’ve done that you can proceed to the next operation in Step 1, Clone.
2.1.2 Clone
As the name suggests, to Clone a project is to make a copy of it. More precisely, the term refers to the Git software command, clone.
After you create your fork, all of the TomEE code is copied over to your own GitHub account in a repository in the cloud. That’s all well and good but to make changes to the code base – to work on JIRA tickets – you need a copy of the code on your own machine so that you can load the project into your IDE, edit files, and test your changes. The Clone operation comes after the Fork as shown below.
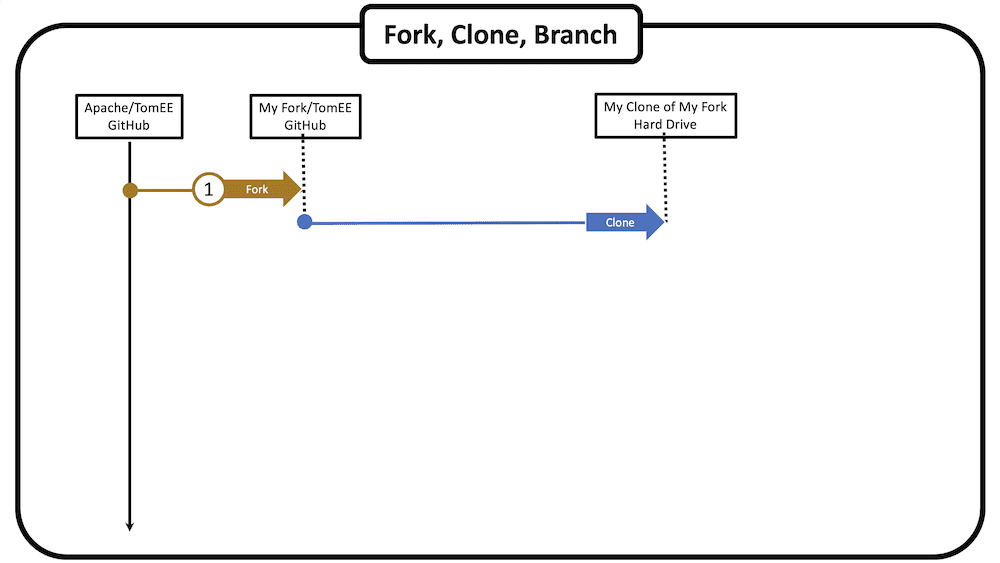
The Git clone command copies the TomEE project down to your local hard drive so you can work on it and later use that local copy to update the copy on your GitHub account.
The process of making a Clone of your own Fork is described in the “Section 2: Setup Git and copy TomEE to your hard drive” part of the “It’s Easy! Get the TomEE Source Code and Join the Community” article published earlier in the “It’s Easy!” series. Go to that section now and work through it and then return to this article to learn about making a Branch, the last operation in the “Fork, Clone, Branch” step of the “Process Task”.
2.1.3 Branch
Next, you need to create a branch of your clone. A Branch is an alternative version of the original repository (in this case your clone) in which you can make changes without affecting the original repository from which the branch was created.
To create a branch open your command line window and navigate to the directory in which you cloned your fork when following the instructions in the article “It’s Easy! Get the TomEE Source Code and Join the Community.” The Git branch command takes the form $ git branch <branch-name>. In our case, we are going to name the branch after the JIRA ticket that we were working on, in this example it’s TOMEE-2496 as shown below. We’ll call that the “JIRA ticket branch”.
$ cd Documents/
$ cd tomee/
$
$ git branch TOMEE-2496
The “Fork, Clone, Branch” creates three repositories: Your fork of TomEE on your GitHub account, the clone of that fork on your hard drive, and a branch of that clone on your hard drive. The diagram below illustrates the three repositories.
I remember when I was first introduced to this process I wondered: Why do I need a fork, a clone, and a branch? That just seems like overkill. Why not just work on the clone of my fork or work directly on the project?
The reason has to do with how your work will be integrated into the main TomEE GitHub project. When you have finished writing your code and are ready to contribute your modifications back to the TomEE project, you issue what is called a Pull-Request. The pull-request sends your code changes to the Apache TomEE project and is identified by your GitHub identifier, but also by the name of the branch. So if your branch name is the same as the JIRA ticket associated with the work, it makes it much easier for everyone to tell exactly what issue your code addresses. It’s also easier to integrate a branch into the main repository than to commit changes directly to it.
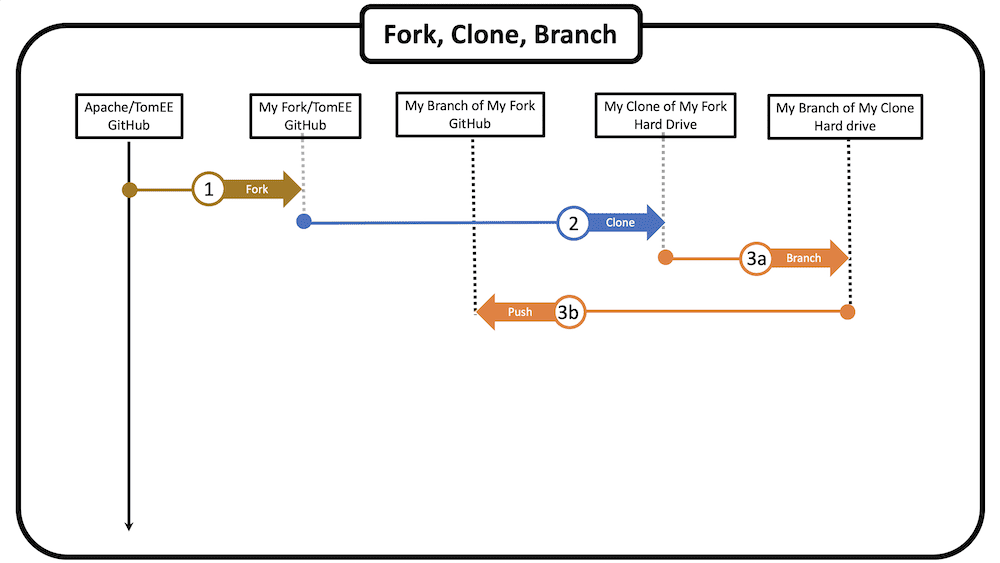
Once you have created your branch on your hard drive you want to copy it back to your GitHub account. Why? Having the branch only on your hard drive risks losing all your changes if you have a hardware failure of some kind (e.g. corrupt disk). In addition, when you eventually issue a pull-request the project committers (people with permission to change the actually main project repository) will use the copy on GitHub because they cannot directly access your hard drive.
The first step is to Checkout your branch. You now have, in effect, two branches on your local hard drive. The main branch is your original clone and the JIRA ticket branch (e.g. TOMEE-2496) you just created. You want to work in the branch you just created but you are currently in the main branch. To move into the JIRA ticket branch you issue the following command.
Now that you are in the JIRA ticket branch you can copy it up to your GitHub account by executing $ git push -u origin <JIRA ticket branch name> on the command-line as shown below:
$ git checkout TOMEE-2496
Switched to branch 'TOMEE-2496'
$
From this point forward, any changes you make in the JIRA ticket branch on your hard drive can be pushed up and preserved on GitHub. I’ll show you how to do that in a bit.
At this point, you have nearly completed the “Fork, Clone, Branch” step of the “Process Task” portion of the Contribution Workflow as illustrated in the diagram below.
The “Fork, Clone, Branch” step is not yet finished. The last thing you need to do before moving on is to synchronize your local JIRA ticket branch with the original Apache TomEE project. Basically, you want to make sure your new branch is as up to date with the original repository as possible.
2.1.4 Git Upstream Configuration
At any time, just before you start working on your branch, you should do an upstream fetch to make sure that your branch is up to date with the main repository. To do that we have tell the Git program on your machine to fetch the code from the original Apache TomEE project, not your personal fork. Why? Because your personal fork is a snapshot of the Apache TomEE project taken at the time you made the fork; it’s not up to date. Any changes made by other contributors to the main Apache TomEE project won’t be reflected in your fork. You don’t want to put loads of work into fixing an issue only to find out that it doesn’t play nice with the code on the main repository.
When I first learned of this process I was worried that the work I had done on my fork the day before would be overwritten. It won’t. What should happen is that all the files you have not been working on will be updated if necessary. If someone has made a change to a file you also changed, then you’ll get what is called a conflict which means your changes and their changes are on the same portion of code. This is a situation that you’ll have to resolve before you can issue a pull-request. This doesn’t happen very often but it is nearly impossible to avoid in the lifetime of a project without locking up all the code so other people cannot work on it.
Right now the branch you created is associated with your personal GitHub account so your branch doesn’t know anything about the original Apache TomEE project. We can tell Git about the Apache TomEE project by executing what is called an “upstream” Git command. The first thing you need to do is get the URL from the Apache TomEE GitHub project. Make sure you go to the original project, not your personal fork. You can tell by the title, it should say “apache / tomee” as shown below.
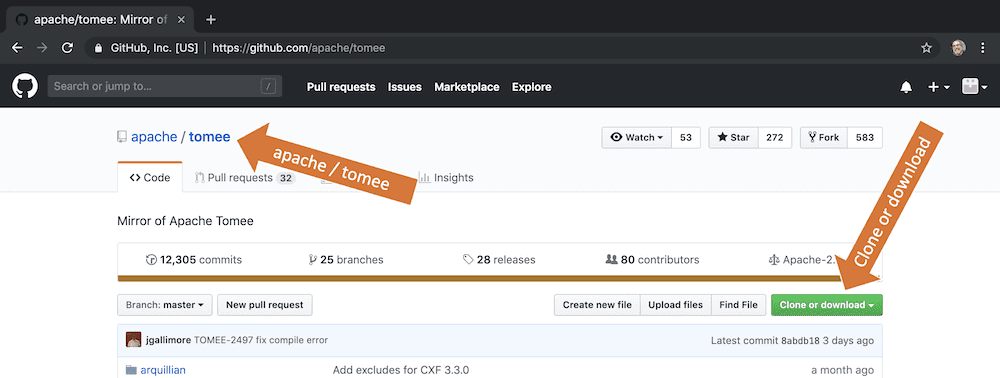
Once you are at the Apache TomEE GitHub page click on the green “Clone or download” button to get the repository’s unique URL. After you click on the green button click on the icon of a clipboard next to the URL shown in the dropdown box (see below). That will copy the URL to your clipboard.
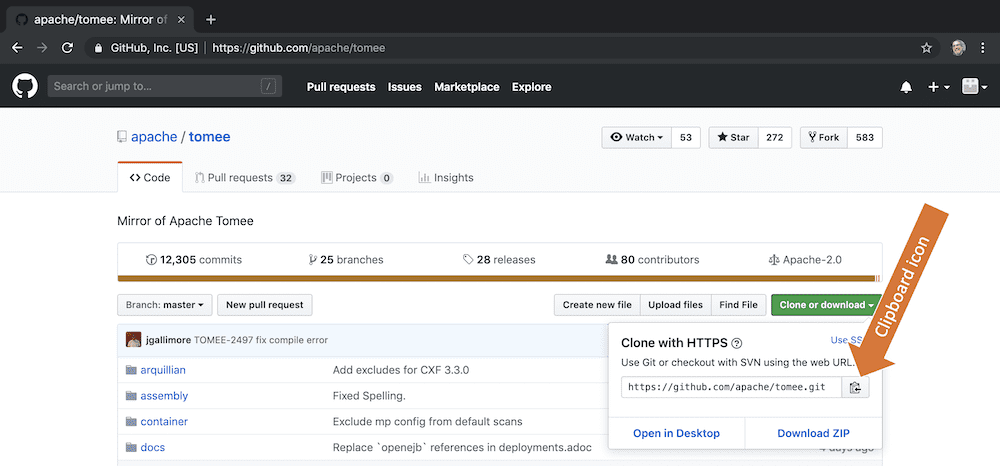
With the URL of the Apache TomEE project in your clipboard execute the Git Upstream command $ git remote add upstream https://github.com/apache/tomee.git as shown below:
$ git remote add upstream https://github.com/apache/tomee.git
$
To make sure you have configured your upstream properly execute the following command $ git remote -v and you should see output like that shown below (I’ve highlighted the upstream urls).
$ git remote -v
origin	https://github.com/monsonhaefel/tomee.git (fetch)
origin	https://github.com/monsonhaefel/tomee.git (push)
upstream	https://github.com/apache/tomee.git (fetch)
upstream	https://github.com/apache/tomee.git (push)
$
2.1.5 Git Fetch upstream
The Git fetch upstream command synchronizes the branch you created on your local hard drive with updates made to the main Apache TomEE repository on GitHub. To do an upstream fetch, execute $ git fetch upstream as shown in the next screenshot (I highlighted the fetch command).
$ git fetch upstream
$
The diagram below shows all the steps we have gone through thus far to fork, clone, branch, upstream and fetch the code so that your local JIRA ticket branch is up to date and ready for work.
2.2 Mark Issue “IN PROGRESS”
 As shown in the diagram below, we are now at Step 2 in the “Process Task” portion of the Contribution Workflow.
To let everyone know that you are working on a particular issue, you want to mark the JIRA ticket associated with the issue as “IN PROGRESS”. Open source is all about transparency and you want people to know you are indeed working on the issue.
- Go to the TomEE JIRA Instance and Log-in
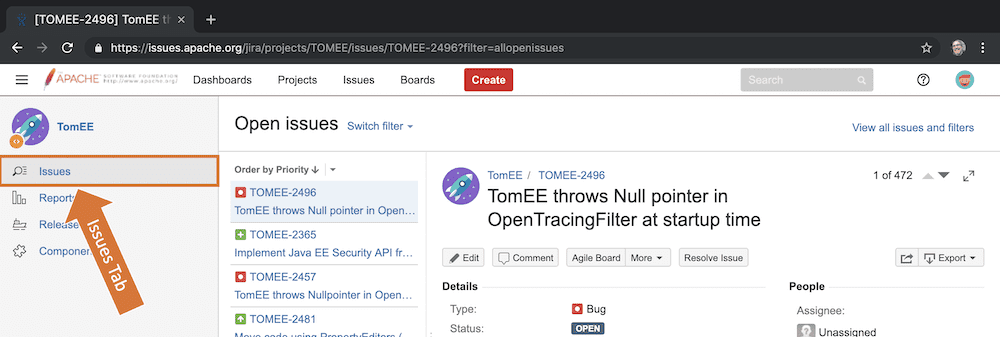
After logging in to TomEE JIRA instance select the “Issues” tab (see orange arrow above) if it’s not already selected by default. Once you are there you can look at all of the JIRA Tickets assigned to you by clicking the “Switch filter” dropdown box and then selecting “My open Issues” menu item as shown below.

Note: If you do not see the “My Open Issues” menu item its because you are not logged into the Apache JIRA instance. Log in with the credentials you created earlier and you will see the menu option “My Open Issues”.
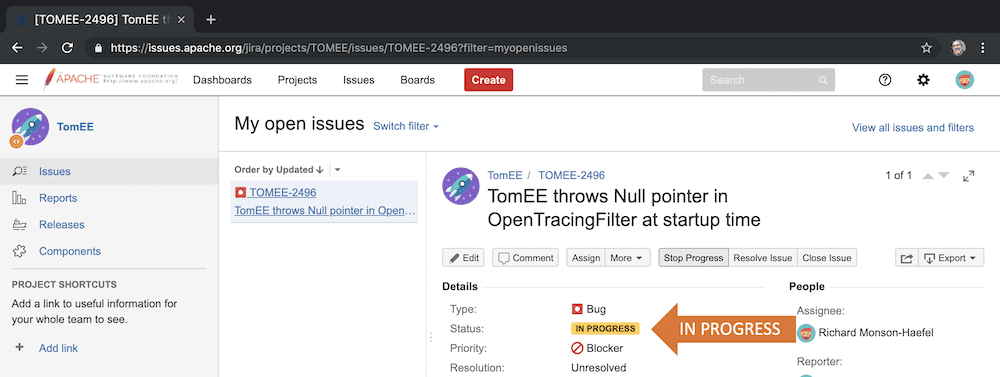
Once you have a view of your open issues, select the one you are working on and look for the “Status” currently marked “OPEN”.
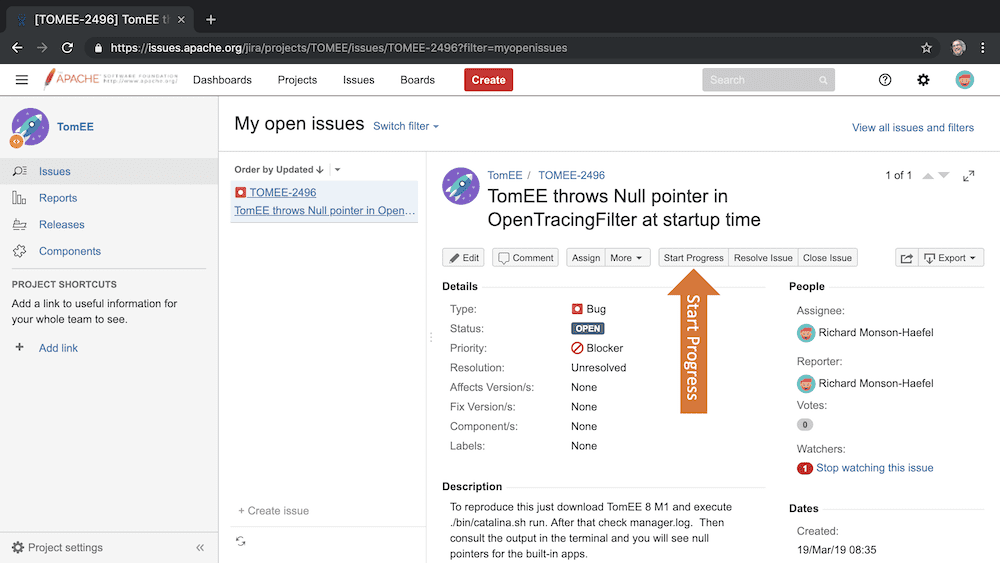
You want to change “OPEN” to “IN PROGRESS” by clicking on the “Start Progress” button in the toolbar as shown in the above screenshot. After doing that the Status field should show that work on the ticket is “IN PROGRESS” as shown below.
Wrapping Up
In this article, you learned about the Process Task portion of the Contribution Workflow. Specifically, you learned about Step 1, “Fork, Clone, Branch” and Step 2, “Mark Issue “IN PROGRESS”. These are the first two things you need to whenever you accept and are ready to work on a new JIRA ticket.
In the next part of this article, we’ll take a closer look at the rest of the process. Most importantly, we’ll be examining in detail how to use Git to manage your edits to your JIRA ticket branch.